Ever since I have been using VMware Fusion, I never really thought about managing the disk space. Primarily because most of my documents and applications were stored on my Mac and not in the virtual machine partition. Therefore, when it did come time for installing applications in VMware, there were installation problems. It takes a little bit of work, but after following these instructions of which my tutorial is based on, you should be all set.
Getting The Tools For The Job
- GParted – (download)
- VDiskManager GUI – (download)
- VMX Extras – (download)
Setting The Max Disk Size
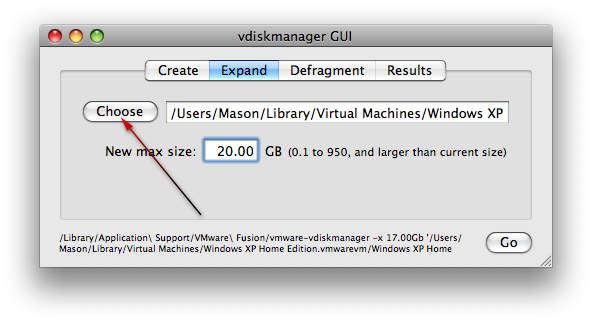
- With your Windows XP virtual machine shutdown completely, open up the VDiskManager GUI application.
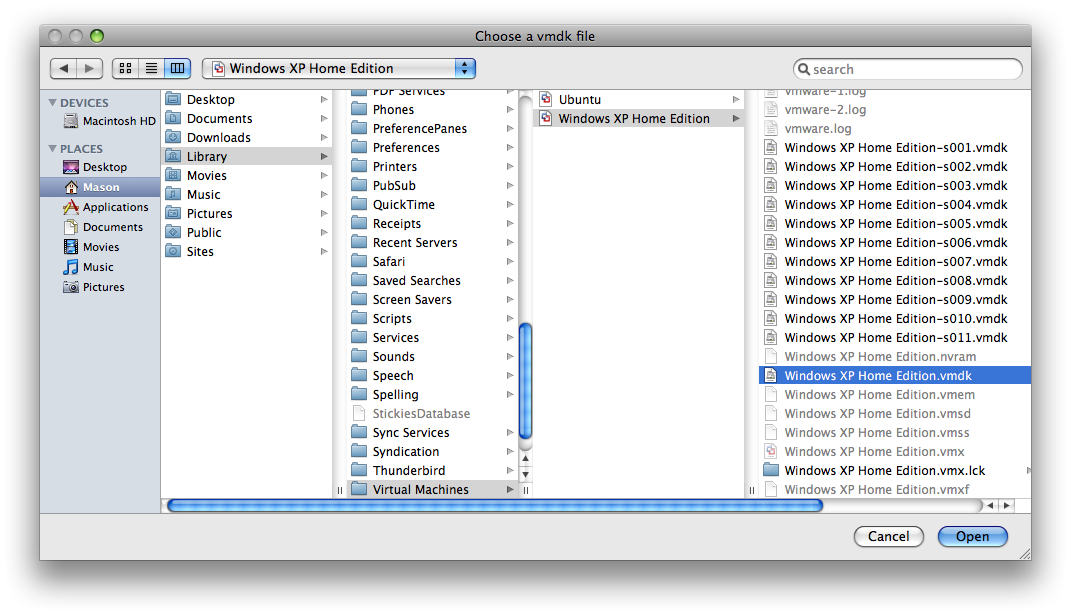
- Click on the Expand tab in VDiskManager. Then click “Choose”.
- Go to “username/Library/Virtual Machines/Windows XP/Windows XP.vmdk”
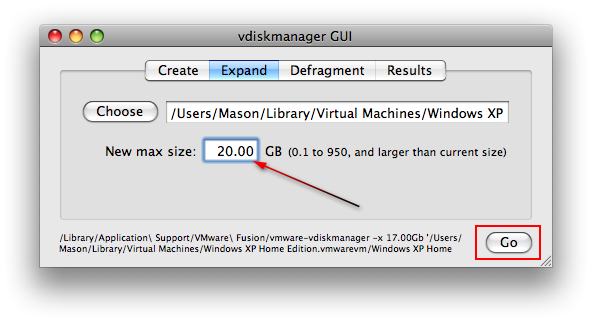
- Type in the maximum disk size you want in the box below. Then click “Go”.
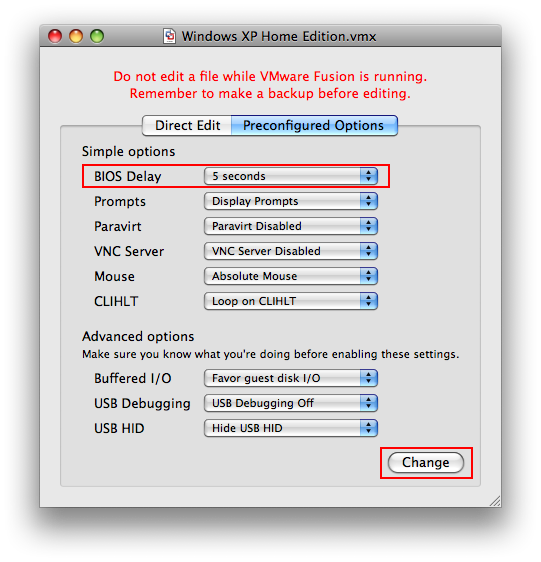
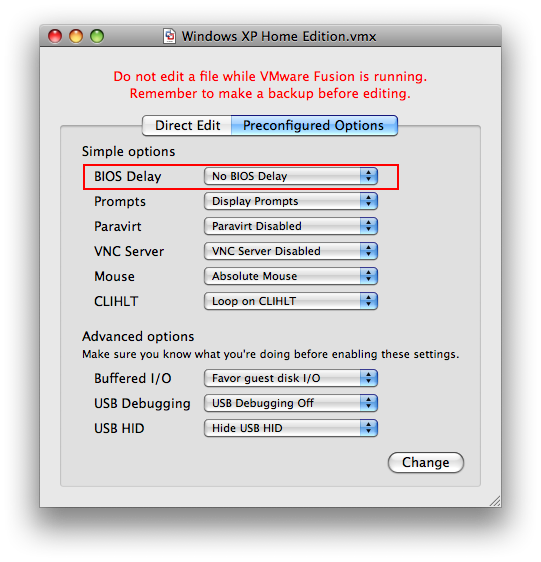
Editing The Startup Screen
- You need to edit the startup screen so you can run commands.
- To do so, open up the VMX Extras application.
- Go to File > Open and browse to “username/Library/Virtual Machines/Windows XP/Windows XP.vmx”
- In the Preconfigured Options tab, change the “BIOS Delay” to 5 seconds and then click “Change”.
- Close VMX Extras and save the changes.
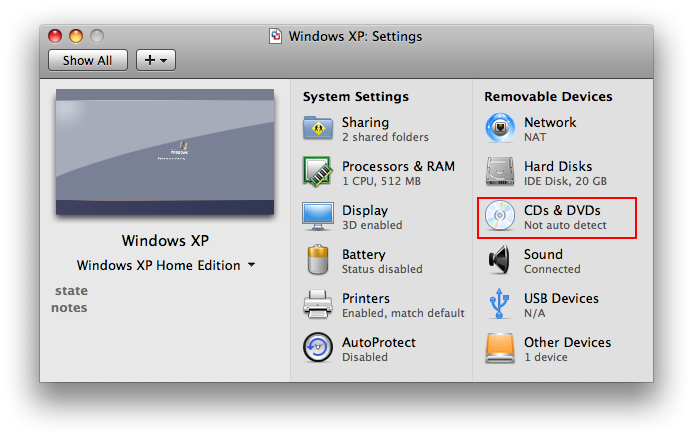
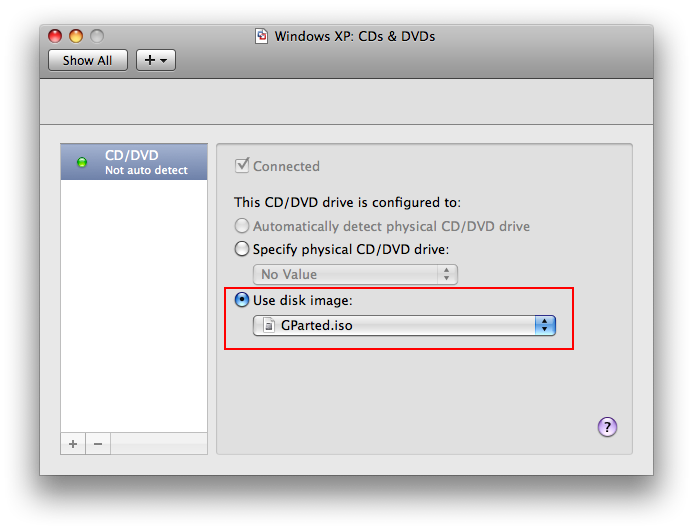
Preparing GParted For Bootup Disk
- In order to make the final changes for the repartition, you need to use GParted.
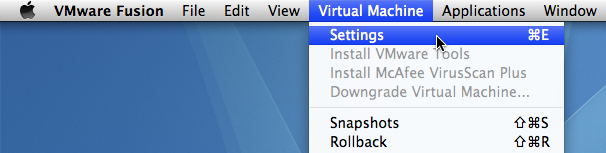
- In VMware Fusion, go to the Virtual Machine > Settings menu (⌘ (Command) + E) and choose CDs & DVDs.
- Under the CDs & DVDs menu, choose “Use disk image” and select the “GParted.iso” file.
- Startup the Windows virtual machine in VMware Fusion now and hold down F2.
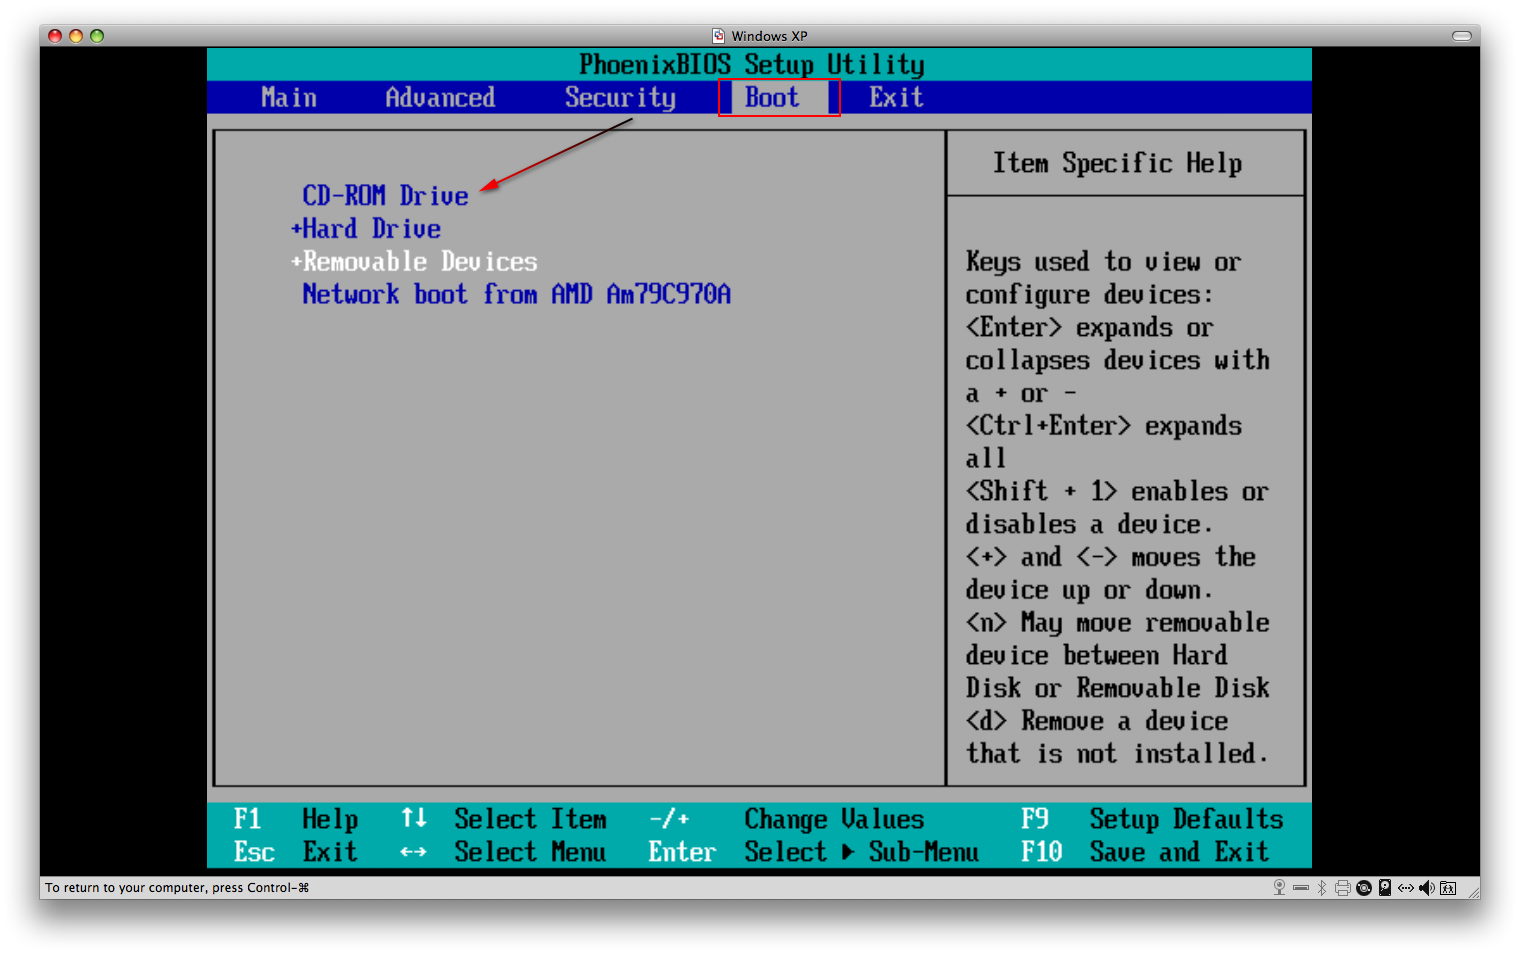
Using The BIOS Startup Screen
- After holding down F2, you should see the Main BIOS screen.
- Hit the right arrow key until you are in the Boot tab.
- Now use the “-” and “+” keys to manipulate the order of devices until “CD-ROM Drive” is on the top of the list.
- Now hit the ⌘ (Command) key and F10 to save the configuration.
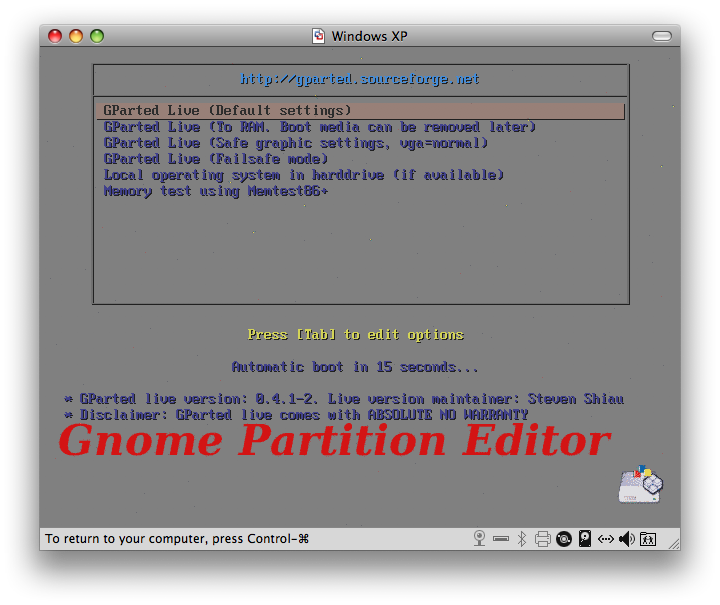
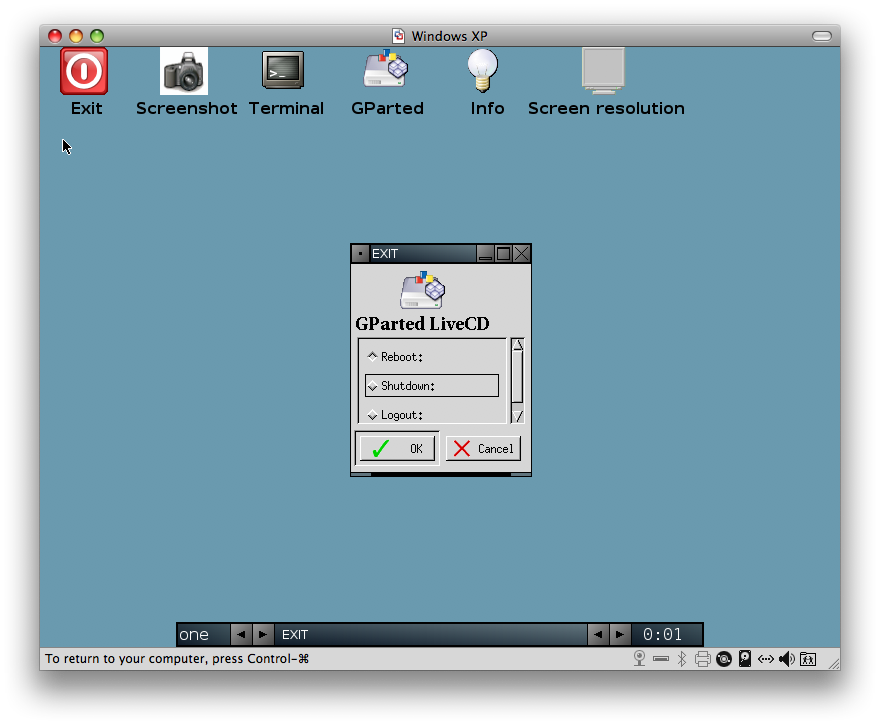
Using The GParted Startup Screen
- After saving your configuration, you will see the GParted intro screen.
- Choose the first option, “GParted Live” (Default settings).
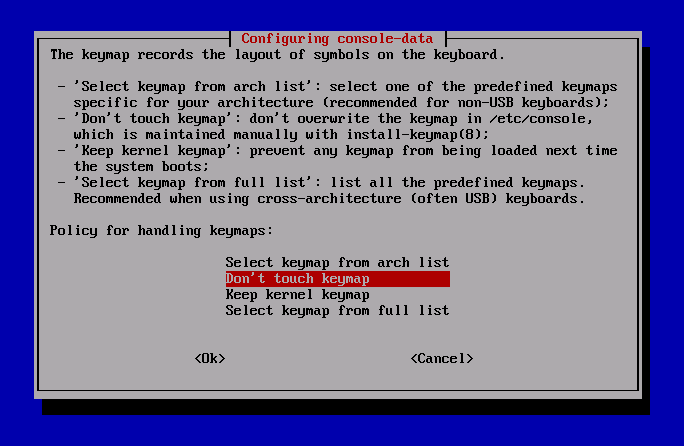
- In the next pop-up screen, choose “Don’t touch keymap” and hit Return.
- Hit Return when asked “Which language do you prefer?” (English is default).
- Hit Return when asked “Which mode do you prefer?”.
- In the GParted screen that appears, use your arrow keys (because the mouse does not always work) and arrow over to “Resize/Move”.
- Now drag the slider with your mouse (if it does not work with your mouse, enter numbers for the boxes). Then hit Tab until the “Resize/Move” button is selected below.
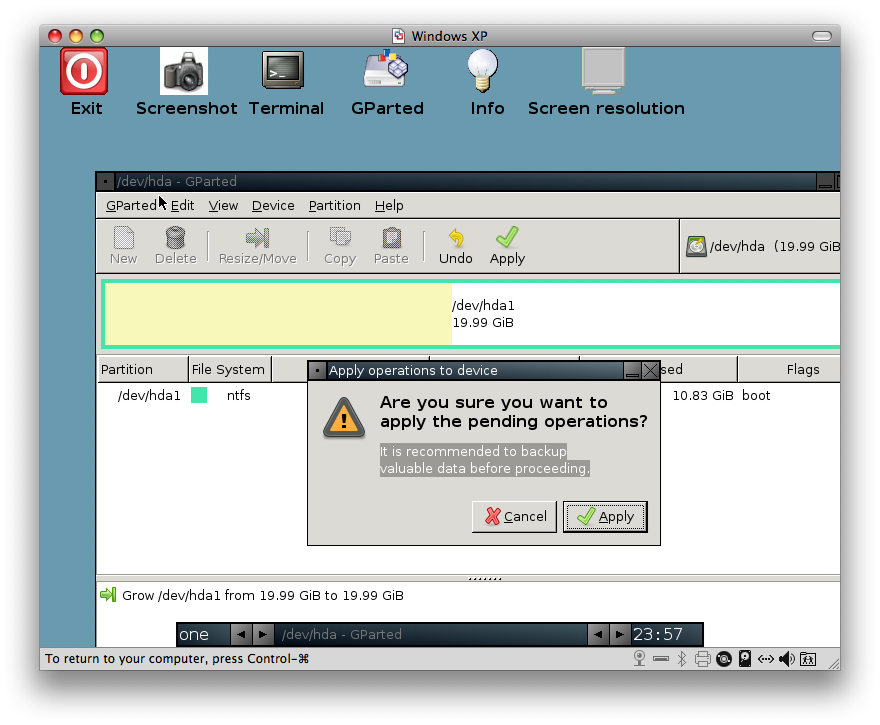
- Now hit Tab once until the Undo button is selected, then arrow over to the right and select Apply and hit Return.
- In the small pop-up window hit Tab until Apply is selected, then hit Return to apply the drive size changes.
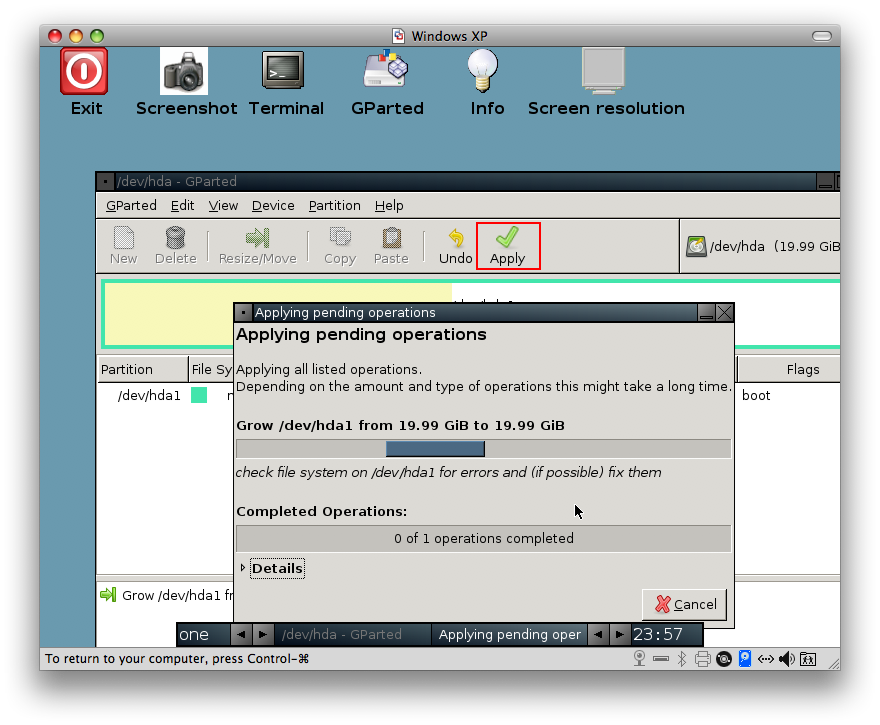
- You should see a window that shows the current status.
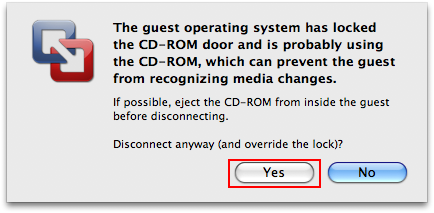
- After it is done, close the window and close GParted by hovering your mouse over the Exit button and then click it when you see the black hand.
- Now use your down arrow keys and choose Shutdown and hit Return.
- As it shuts down you may receive a message window, choose Yes and hit Return to finish the shutdown.
- If Windows starts up by accident, just shut it down from the main screen.
Final Touches Before Using Newly Repartitioned Virtual Disk
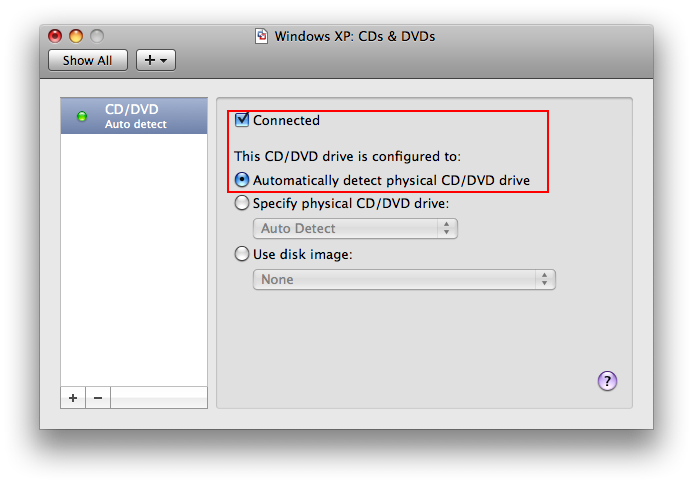
- Go to the Settings menu in VMware Fusion after making sure the virtual machine is shut down.
- Under the CDs & DVDs settings, change it so it says “Automatically detect physical CD/DVD drive”.
- With your virtual machine off, go to VMX Extras and open the “username/Library/Virtual Machines/Windows XP/Windows XP.vmx” file.
- Go to the Preconfigured Options tab and change the BIOS Delay back to the default which is “No Bios Delay”.
- Boot up Windows, it may do a disk check if necessary and may require you to restart after it fully boots.
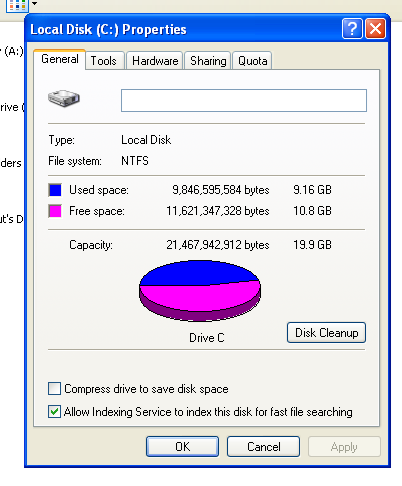
- Double check that your hard drive disk space has increased (My Computer > Local Disk (C:) > Right-click > Properties).
Alex
Mar. 4, 2009Great instructions, thanks! Not sure if this is a foolish question, but can I use the similar procedure to make my virtual machine partition SMALLER? Just about every piece of info I can find online is about how to grow it. I used to use it for GIS software, but now I rarely use it at all and would like to reclaim the hard drive space to facilitate burning DVDs in Mac OS X.
Mason Sklut
Mar. 4, 2009Alex, it should work just fine. You follow the same steps, but just change the partition to the appropriate size you want. Let me know if there are any problems.
Olli
May. 8, 2009Thanks for this tutorial. I was looking for something like this but didn’t find any, and I can see you have put some time to it.
One problem I met though. When I tried to change the max disk size with VDiskManager, it didn’t show any information or warnings. This was because of the “snapshot-chain”. I realized this problem from trial and error. In Terminal, I discovered this because it shows the status. After I deleted all the snapshots in VMware Fusion, it worked fine.
Chuck de Young
Jul. 27, 2009If doing this on a MacBook Air make sure the CD/ROM drive is “Connected”. It probably will default to disconnected. The boot to GPartEd Live will not happen if the connected property is not set.
Mason Sklut
Jul. 31, 2009Chuck, I appreciate you pointing that out.
Thanks,
Mason
Paul Pogonoski
Aug. 2, 2009This has been plaguing me for months, and I’ve finally found the solution!
Great instructions, but the clincher was the hitherto unknown VMWare utilities (less GParted which is an old Linux friend) that has made some thing that I couldn’t get working, work.
Great work!
Richard Ladson
Aug. 3, 2009Thanks for sharing your expertise.
I wish to shrink (not expand) the size of the partition allocated to Win/XP, however, the VDiskManager GUI insists that the new partition size be larger than the existing size.
Therefore, it appears that one cannot shrink the partition size, am I wrong?
Thanks.
Mason Sklut
Aug. 3, 2009You’re very welcome Paul. Glad you got everything working now.
Thanks,
Mason
Mason Sklut
Aug. 3, 2009Hey Richard,
I actually had no problem shrinking the XP partition on my computer. In fact, you don’t do the actual shrinking until the GParted screen (during BIOS reboot).
Just follow the screenshots I have during the GParted steps and drag the partition slider the other way to shrink it.
Thanks,
Mason
Tore G
Aug. 13, 2009Thanks a lot! Really useful. I thought that VMWare Fusion could handle this on it’s own. This guide helped out.
Mason Sklut
Aug. 14, 2009You’re very welcome. I appreciate the comment.
CJRH
Feb. 11, 2010I followed the steps up to hitting “apply” in GParted. It gave me an error when I tried to shrink the disk. Reading online, I found that the error might be solved by a simple defrag of the drive. I went to perform my defrag and somehow it’s eating up my available Mac hard drive space. I keep having to delete files just to create room for the defragmentation to finish. What it’s acting like is that somehow it’s ignoring the original NTFS partition and creating a new one. What do I do? HELP!
Mason Sklut
Feb. 11, 2010Assuming you have not partitioned anything successfully, your best bet is try again.
Let me know how it goes.
Thanks,
Mason
CJRH
Feb. 13, 2010I actually just deleted all of my .vmdk files and called it good. It was become more of a hassle than it was worth. Bye bye Windows XP.
Thanks for the help, Mason.
Mason Sklut
Feb. 13, 2010CJ,
I’m sorry I was not much help. Typically, errors can be fixed by re-doing or re-moving. I’m glad you found a fix though.
“Bye bye Windows XP” is a statement I would like to hear more often :-)
Thanks,
Mason
Justin
May. 17, 2010When I reboot XP and hold down F2 the only thing that happens is my brightness goes all the way up.
Mason Sklut
May. 18, 2010Justin, have you tried holding down Function (Fn) when you press F2?
Let me know if that works,
Mason
Ken Williams
Jun. 3, 2010Wow, many thanks for this. I’ve been trying to permanently shrink my Virtual Disk even since I mistakenly allocated 70 GB to it when migrating from Boot Camp. Like one of your previous writers, all I could find were instructions to make it bigger! It’s now 35 GB and I won’t have to buy a new drive! Cheers!
Mason Sklut
Jun. 6, 2010Thanks Ken. I’m glad you found my tutorial helpful.
– Mason
Jo Rossi
Aug. 26, 2010Hey Mason. If I’m running VMware Fusion 3 — the steps requiring Vdisk Manager to expand the drive — do I need to do that or can I do that in VMware because there is that option in the hard drive tab to expand the drive size and rewrite the vm file, it seems to be doing what vdiskmanager is doing. Am I correct?
-Jo
Jo Rossi
Aug. 26, 2010Just my luck … keep getting errors … won’t take.
Mason Sklut
Aug. 28, 2010That’s correct Jo.
Mason Sklut
Aug. 28, 2010Try it from scratch (new virtual machine) and run through my tutorial again.
Thanks,
Mason
Tony O
Nov. 23, 2010Hey Mason,
Thanks so much for this information! You are the only one I could find with some decent instructions and a good FREE repartition program. Although I was a bit new at using that type of interface, all went well. GParted worked well with a few quirks with the mouse/tab buttons. Ha — I have Fusion 3.1.1 and for some real stupid reason when I first installed Fusion 1, I only allocated 15GB. OK, stupid move. But now with XP I have a new 50 GB HD. Again, thanks for everything. To the others out there: take your time, work with that interface instead of just giving up. It will work just as you said. You did well here. I have worked with Apple over 25 years and I am proud to see sites like this helping others.
Best wishes,
Tony
Mason Sklut
Nov. 24, 2010I appreciate the kind words Tony.
Thanks,
Mason
Frank Todd
Jan. 7, 2011I have made a very large virtual disk on my Windows 7 in VMware. I made the mistake of checking the “pre-allocate disk space” when I made the disk. I need to make it small again but I cannot because the minimum size is now fixed and very large. How can I fix this?
Thanks,
Frank
Mason Sklut
Jan. 7, 2011Frank,
You should be able to shrink it following my instructions. Let me know if that works.
Thanks,
Mason
Gary Shergill
Jan. 11, 2011Hi,
Will this work on Windows 7 as well? I have Windows 7 Environment and have 60 GB allocated, but when I go into Windows 7 on my Mac I only see 40 GB available. However, if I go to Manage > Disk Management, I see two Partitions (partition type is Basic) 40 GB and 20 GB. The 20 GB is Unallocated.
Please advise.
Thanks.
Mason Sklut
Jan. 11, 2011This will work just fine on Windows 7. Follow my instructions. Please keep me posted if you have any problems.
Thanks,
Mason
Frank Todd
Jan. 13, 2011Mason,
It did not work. What I had to do was actually delete the virtual disk and reload in Fusion and Windows. Essentially re-install everything. Of course, now I cannot get Windows 7 to see my other computers on the network. My old Lenovo is looking pretty good at this point…
Frank
JesterEE
Jan. 20, 2011Followed these directions loosely to increase the main partition of a Windows XP client on a Linux host using VMware player 3. Worked like a charm! If you don’t have the VMX extras tool, you can simply add the following line to your VMX file to accomplish the same thing:
bios.bootDelay = “boot delay in milliseconds”
example: bios.bootDelay = 5000 (5 seconds to enter the bios)
Thanks for the write-up.
Mason Sklut
Jan. 21, 2011Thanks Jester!
Sam K.
Feb. 19, 2011Hi Mason,
Thanks so much for providing these instructions! I’ve just started following them as I want to reduce the size of my VM disk (I’m using VMware Fusion v3.1.2 on Snow Leopard).
I recently increased the disk size through Settings > Hard Disks in VMware itself, but since doing this I get warnings saying that the disk the virtual machine is installed on is running out of space and I have to suspend it. I went back to the same Settings window, but it will only let me move the slider up to increase the disk size, it doesn’t allow it to be made smaller!
The original size of the VM was 40GB, and I was planning to move a lot of data over, so I added 80GB to make it 120GB. Now when I look at it in Windows Disk Manager it says that Disk 0 is 120GB, with 40GB on C: and 80GB “Unallocated”. Since I now get errors about running out of space I want to change things back to the way they were, leaving the VM at 40GB and removing the extra 80GB I tried to add. Should I follow your steps or is there something else I should try?
In step 3 of your instructions you need to go to the Windows XP vmdk file, however I can’t find one — the only file I have is Windows XP.vmwarevm under DocumentsVirtual Machines. Will this work? I also noticed on the vdiskmanager GUI screen for “Expand” it says “New max size: (0.1 to 950, and larger than the current size)” doesn’t this mean it would only make things bigger and not smaller?
I hope this isn’t off the topic too much and welcome any suggestions!
Mason Sklut
Feb. 20, 2011Hey Sam,
I’m glad you were able to follow these instructions.
Your first problem was changing the virtual disk space and not the actual physical disk space. By changing the size through the Settings window, you aren’t changing the actual hard-drive disk space allocated for the virtual machine. In order to do so, you must use the vdiskmanager GUI application.
My best suggestion is to try using this application:
http://www.partition-tool.com/easeus-partition-manager/extend-system-partition.htm
Please keep me posted on your progress!
Thanks,
Mason
Sam K.
Feb. 20, 2011Hi Mason,
Thanks for the quick response! I had a look at EASEUS and it looks perfect for increasing the partition size of C:, however it doesn’t seem to let me remove the “unallocated” 80GB I created in VM Fusion.
I’m still not sure if vdiskmanager GUI will work on the “Windows XP.vmwarevm” file I have as opposed to the “Windows XP.vmdk” file in the instructions.
Is there a different procedure for the different file type?
On the plus side, I haven’t had any running out of space messages all day so maybe the problem has gone away (fingers crossed)!
Thanks,
Sam
Mason Sklut
Feb. 20, 2011Sam,
It is definitely possible that the problem has gone away if you are not seeing those warning messages.
For the “.vmwarewm” file, I’m not quite sure what you should do with it. I’ve only used the “.vmdk” file for adjusting disk space. Therefore, I cannot suggest anything for you. If you are still curious about it, it can’t hurt to post your question on the discussion boards over on VMware’s website (http://communities.vmware.com/community/vmtn/desktop/fusion?view=discussions).
Best,
Mason
Sam K.
Feb. 21, 2011Thanks Mason,
It has been working fine for 2 days now with no more error messages, so I think I might be out of the woods after all! Thanks for all your help, good idea to post on the VMware forum too.
Cheers,
Sam
Mason Sklut
Feb. 21, 2011Sam,
I’m glad to hear you’re not having anymore problems so far with VMware. Let me know if you need help with anything else.
Best,
Mason
Chethna
May. 6, 2011Hi, I want to know how to find space allocated on SAN in VCenter…
Mason Sklut
May. 6, 2011Chethna,
Unfortunately, I do not have an answer for you.
However, I recommend you take a look at the VMware Support page.
Thanks,
Mason
Nicole Hanusek
Aug. 10, 2011Thank you thank you thank you!!!
Mason Sklut
Aug. 12, 2011Nicole, you’re quite welcome. I’m glad you find my website helpful.
Kristin
Aug. 21, 2011Mason, thank you so much for sharing this! I had one error when I Gparted but then I went through the steps again and everything worked perfectly. I was so worried I was going to have to wipe and reinstall everything and now I don’t have to.
Thanks again,
Kristin
Mason Sklut
Aug. 22, 2011Kristin, you are very welcome! I’m glad you found my website helpful.
Best,
Mason
Pete
Aug. 31, 2011Mason,
thanks for a great guide.
I do have one issue after – I’m running Fusion 3 and wanted to reduce my disk size from 111GB to 83GB, I followed the guide, and specified the 83GB on the GParted screen, and the reduce in size seemed to work fine.
In Windows VM the disk is correctly showing now as 83GB in Windows File Explorer, however on the Mac the VMWare files still add up to 110.75GB collectively.
I have tried using VM Tools inside Windows to perform a ‘Shrink’ which ran successfully, but still the VMWare files are same size.
Also tellingly, if I go to Virtual Machine > Settings menu , and Hard Disk, the size still shows as the old size 111.80 GB.
Any ideas much appreciated, as the whole point for me was to regain some space for my Mac.
The only other thing to add is I do have two disks in Windows, the C: drive is smaller at 28GB (I did not reduce the size of this), and a F: drive which is the 112GB one that I reduced.
Also a Step 1 (with VDiskManager) I was not sure which .vmdk file to choose as I have 2 (one for C: drive and one for F: drive) , I chose the F: drive one but as others have said at this stage you’re not allowed to reduce the size, so I think I left as is (I forget now)
Mason Sklut
Aug. 31, 2011Pete, if you’re following my steps to shrink the physical (not the virtual) disk size, then there shouldn’t be any problems such as the ones you’re encountering. My best recommendation is to try the process once more and see if the problem repeats. I can’t think of any reasons for why this is occurring on your end. Please let me know how “Shrinking: Part 2” goes!
Thanks,
Mason
AG
Aug. 31, 2011Mason,
Great guide but it does not work for me. Running Vista on VM 2.x I tried to increase partition size. When GParted runs it has no concept where the mouse clicks so somehow or another used tabs and arrow keys to apply the resize. It starts running but then quits reporting an error (the nature of which I could not determine).
Any suggestions?
Thanks!
Mason Sklut
Aug. 31, 2011AG,
That could simply be that the program GParted has some bugs in it. Try repartitioning again and see if the problem occurs.
Thanks,
Mason
AG
Sep. 1, 2011Mason,
Tried multiple times with the same result. Also updated to Fusion 3.1.3, created a new VM of 150G and migrated the old one to it. Still VISTA thinks it is running on 70G or so. Tried GParted again and got the same results. It seems as if a pragmatic approach would be to toss all that junk out and start from scratch; Welcome to Vista.
AG
Mason Sklut
Sep. 1, 2011AG,
To be quite honest, that may be the best solution at this point.
Jerry
Nov. 16, 2011Attempted twice each with the resulting error:
oxcoooo225
Requesting the Windows disc.
How can I resolve this without the disc that I misplaced?
Mason Sklut
Nov. 17, 2011Jerry, I’ve honestly never heard of anyone getting this error during the installation process. Are you trying to using a disk image instead of a physical disc?
John
Dec. 23, 2011Hi Mason, I am using VMware Fusion 3.1.3. I tried expanding a virtual disk (non-OS 2nd hard disk) by moving the slider bar from 300GB to 500GB. It seems instantaneous but when I boot up my Windows 7 VM, the whole 500GB is unallocated and Windows Disk Manager prompts for disk initialization which I’m afraid might wipe out my data. I had tried expanding from 250GB to 300GB before without trouble but do not remember it to be this quick. How can I monitor to see whether the disk expansion is in progress or had died and corrupted my virtual drive?
Mason Sklut
Dec. 25, 2011John, I’m not sure why this would happen. From the BIOS screen does it show any changes to the hard-drive allocation?
Matt
Dec. 29, 2011OK, followed all steps to detail only 2 things I have as an issue. I never found GParted.iso, but I did find a Gparted-live4.1.iso, so I used that. Secondly, I got all of the f2 part… got to the boot tab and said I was in user mode and couldn’t adjust the CD-ROM… How would I get out of user mode?
Mason Sklut
Dec. 29, 2011Matt, you need to find GParted.iso for the process to work properly. As far as escaping user mode, I am not sure how… Try following the steps one more time. Let me know if you encounter any other issues.
Best,
Mason
Matt
Dec. 29, 2011Thanks for all your help. It is nice to have some knowledge in my corner. As far as the iso, I clicked the download above and it comes up with the live version 04.1.iso. I did a search for it after and downloaded on my computer to no avail. . and still stuck on supervisor mode and user mode under the step Bios part. . .also anyway to run the xp version from 32bit to 64? Thanks again.
Mason Sklut
Dec. 29, 2011Matt, here’s the link to the newest GParted.iso:
http://sourceforge.net/projects/gparted/files/gparted-live-stable/0.11.0-7/gparted-live-0.11.0-7.zip/download
Try it out and tell me how it goes.
I’m only familiar with running 64bit Vista, but not XP…
Matt
Dec. 30, 2011Yeah, BIOS isn’t allowing me to. Says something about USB not reading the F9. I tried uninstalling VMware and then repartitioned it that way and reset parameters… I am at a standstill unless I can figure out a full uninstall and full reinstall.
Thank you anyway.
Mason Sklut
Dec. 30, 2011That’s weird… F9 should work, did you try holding down the command key with F9?
Ralph McBride
Jun. 5, 2012Have two complications in using your instructions.
1. At “Preparing GParted For Bootup Disk,…. 3. Under the CDs & DVDs menu, choose “Use disk image” and select the “GParted.iso” file.” I could not get the iso file selected in the window. had to go into folder and selected initrd.img.
2. Having done that, the software would not allow me, in the Bios, to change to CD/DVD option. It required I contact a system manager.
What am I doing wrong?
Mason Sklut
Jul. 1, 2012Ralph,
That’s strange… My best recommendation is to try starting from scratch. This process should work rather smoothly, and without error. Please let me know if you are still having issues.
Best,
Mason