When it comes to photo editing, iPhoto’s capabilities are not up to par with Bridge or Aperture. Thanks to Apple making Aperture it’s quite easy to import your existing iPhoto library. After this tutorial, you will have easy access to all of your pictures from iPhoto within Adobe Bridge. Note: this will NOT work with iPhoto ’09 or later.
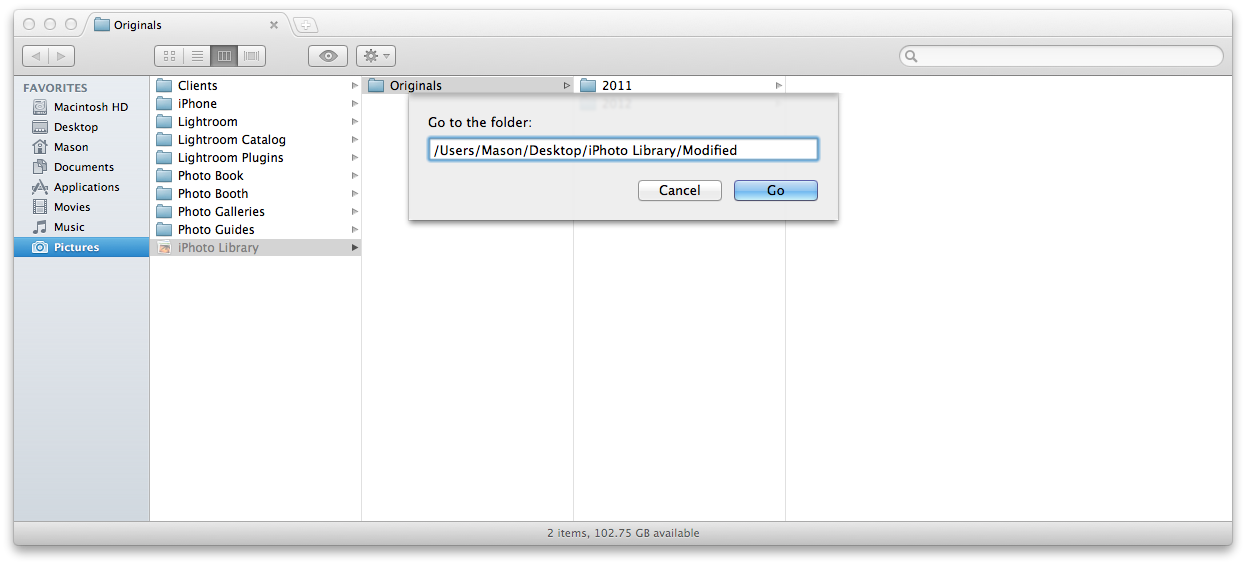
- Open up Finder and select “Go to Folder…” under the Go menu.
- Type in “/Users/yourusername/Pictures/iPhoto Library/Originals.”
- Next, Type in “/Users/yourusername/Pictures/iPhoto Library/Modified.”
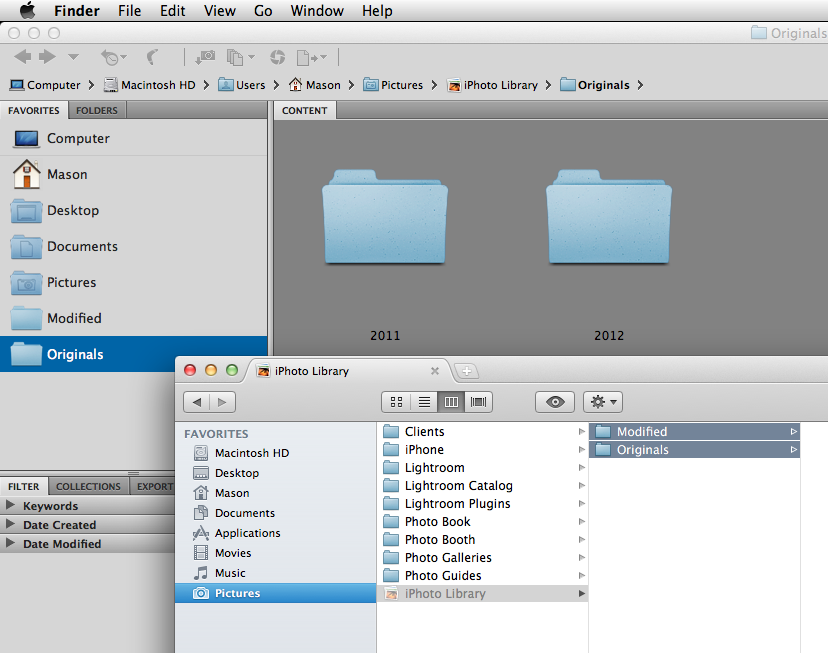
- Select both folders and drag them into the Bridge sidebar.
- That’s all!
Mason Sklut
Nov. 1, 2008Note: I’ve revised this tutorial to solve the problem of not being able to make alias folders. This is due to a new file structure in Mac OS X 10.7 and higher. Please read the tutorial and you’ll find that it’s a simple fix!
Thanks,
Mason
Jeff Chapman
Nov. 6, 2008I enjoyed your comment on using the iPhoto Library in Adobe Bridge, and found it very useful indeed. It certainly does help in making the iPhoto library more readily accessible.
Keep up the good work! I also like the clean look of your site, BTW. You’re a Mac Genius? It shows…
Mason Sklut
Nov. 6, 2008Thanks Jeff. It’s taken me a while to get the hang of designing a WordPress blog, but it was worth it.
As an outdoor photographer, I find it necessary to use Bridge for color correction. Don’t get me wrong about iPhoto, I love it for cataloging my pictures.
I’m glad you like the site, it was time for a change.
Thanks again,
Mason
Russ Lazar
Apr. 9, 2009I recently updated iPhoto 6 to version 8 in iLife ’09. When I went to Bridge in Photoshop Elements 6, all my previous file extensions have been changed from .jpg to .approject. These files do not open as a picture. I can open them with iPhoto for editing purposes and can save to any extension as before but I don’t understand why I can’t see jpegs in Bridge. Adobe has been no help as they point the finger at Apple and Aperture (which makes some sense). Have you encountered this?
Thanks,
Russ
Mason Sklut
Apr. 10, 2009Russ, fortunately, I have not encountered this problem yet. When I wrote this article I was using Bridge CS3 and iPhoto ’08. I need you to clarify where the “.approject” files are located. Only the Aperture.app can create “.approject” files, so I’m a little bit confused with the way you described your situation. If you want to try and extract the images from the “.approject” files, try using the File Juicer app.
Thanks,
Mason
Philipa Veitch
Aug. 2, 2009Thanks for the advice.
I have a problem in that I do not seem to have any folders named originals or modified in the folder you referred to. Any help would be greatly appreciated!
Thanks and kind regards,
Philipa
Mason Sklut
Aug. 3, 2009Philipa,
If you are using the newest version of iPhoto, then it will be different. Go to the Pictures folder in Finder and right-click on iPhoto Library. Then choose Show Package Contents.
You should see the Original and Modified folders in the Finder window that pops up.
Thanks,
Mason
Philipa Veitch
Aug. 4, 2009Hi Mason,
Thanks for your reply. I have iPhoto ’08; is it possible to access images from this version in Bridge?
Thanks again for your help.
Philipa
Mason Sklut
Aug. 4, 2009Yes. It should work just fine.
Anna
Oct. 28, 2009What? Right-clicking is supposed to work with the iMac mouse? I have had it for 3 months now and the mouse never let me right-click. I thought it was just something Apple had missed! I sorely miss right-clicking. Could I have a faulty mouse then? I am trying to figure out the best way to get my iPhoto pics into Bridge.
Mason Sklut
Oct. 29, 2009Anna,
You should no problem right-clicking with the mouse that came with your iMac. Assuming you are using a Mighty Mouse, you can set it up in System Preferences to right-click.
To answer your second question about the best way to get your iPhoto pictures into Bridge—I need to first know if you want to completely switch over to Bridge or use both.
If you want to use both applications (one to edit, one to manage) then I suggest you just create an “alias” folder as I wrote in my tutorial.
Email me on the Contact page if you want more help.
Thanks,
Mason
Rachel
Dec. 27, 2009Is this the best method to use if I am trying to completely switch over to Bridge? All of my pictures are currently saved through iPhoto, but I want to switch to Bridge to organize and use Elements 8 to edit.
Thanks!
Mason Sklut
Dec. 28, 2009Rachel,
Use iPhoto’s export feature instead.
Select all the photos you want to export and then go to File > Export.
In the File Export window, change the export options:
Kind: Choose a file format for your exported images from the Format pop-up menu.
“Current” exports the photo in its current format. If you imported a RAW-format photo and then edited it in iPhoto, the photo is saved as a JPEG file, so the photo will be exported as a JPEG file. “Original” exports the photo as it was originally imported into iPhoto, before editing.
If you choose JPEG format, choose the quality of the JPEG file from the pop-up menu. The higher the quality is, the bigger the photo is, so if you’re sending the images via email, you may want to choose Low quality so that the email is sent and received more quickly.
If you choose JPEG or TIFF, select the “Titles and keywords” checkbox if you want the titles and keywords to be exported with the photos. For the same formats, select the “Location information” checkbox if you want the photo locations exported with the photos.
Size: For email or web use, choose Small or Medium, depending on your connection speed. For higher-resolution printing, choose Large or Full Size, the exact size of the actual picture.
If necessary, select Custom to scale images to a specific size by specifying a maximum width and height.
File Name: Choose whether to export photos in sequence, or by their filenames, iPhoto titles, or album name.
If you choose Sequential, type the word you want to use as the prefix for the number sequence. For example, if you want to identify all the photos as part of a surfing sequence, you could type “Surf” in the “Prefix for Sequential” field. This is optional, so you can choose to leave the field blank.
Click Export.
Choose a location for the photos you’re exporting, and then click OK.
It’s a good idea to create a folder to receive your exported photos.
Thanks,
Mason
DesB
Jan. 22, 2010Thanks for great tip.
Maybe just a silly question, but I’m just curious.
I don’t understand why some of the iPhoto pictures get duplicated into the Modified folder, but are still in the Originals folder?
I tested by editing a photo in iPhoto and logically expected the revised picture to appear in Modified, but that didn’t happen.
I guess main question is whether I just automatically go into Originals within Bridge and ignore Modified?
Thanks!
Mason Sklut
Jan. 22, 2010DesB,
The purpose of accessing your iPhoto library with Bridge is so you can edit them in Bridge. When you start editing in iPhoto—as you have noticed—things get a little out of place. My best recommendation is to stick with editing the images only in Bridge and use iPhoto for managing them. Let me know if you need any help. Also, changes you make within Bridge only show in Bridge, not iPhoto.
Thanks,
Mason
Harold
Feb. 7, 2010Hi Mason,
Thanks for taking time for all the tips, I have a question please.
If you go through all the steps making the aliases and then make the adjustments in PSE 8 will these changes be reflected in iPhoto or will there be duplicate photos, one changed and then the original? And if this is not changed in iPhoto do we have to then import back into iPhoto. Sorry for the long question and thanks again.
Mason Sklut
Feb. 7, 2010Harold,
This is an excellent question. When you’ve made changes in Photoshop Elements, it should prompt you to save your changes in the Save As window. Make sure you are not clicking the Saving As option, but rather just clicking Save. If it prompts you with a “Replace” option, go ahead at do that. iPhoto will show these changes. However, any changes you make in Adobe Bridge, will only show in Adobe Bridge.
Thanks,
Mason
Elizabeth B.
Apr. 13, 2010Hi Mason,
Thanks so much for these instructions. I have a quick question for you. Within my Originals alias file, my folder system seems to be a bit wonky (technical term ;)). For instance, my photos from April 4th are located in the April 6th folder. Is this a common problem and is there a way to fix it?
Many thanks,
Elizabeth
Jeremy
Apr. 13, 2010Once an alias is created in iPhoto, are new imports added to that alias folder also?
Mason Sklut
Apr. 21, 2010Jeremy,
An alias folder refers to the original folder when it displays its contents.
– Mason
Mason Sklut
Apr. 21, 2010Elizabeth,
The only way an alias folder works is by referring to the Originals folder. Double-check the structure of the Originals folder for any errors like the ones you mentioned. Otherwise, this is not a common problem to be occurring.
– Mason
Mary George Hilbun
Jul. 6, 2010Hello there,
I followed your steps above to make an alias & put them into a folder in my Pictures folder but my photos are not all there! I have checked Modified alias & Original alias in BR. I have even gone into iPhoto, copied down the filename of the photo (many of them) & searched BR but: Nothing to display. I see lots of my photos in there, but I could see that I was missing some, therefore the search. Can you help me?
Thank you, I love your site…you are my guru!
Mason Sklut
Jul. 10, 2010Mary,
Usually when you edit images in another program aside from iPhoto or Bridge, this will mess up the file structure. At this point, your best bet is to re-import the photos into iPhoto (it will automatically detect duplicates). I hope this works for you.
Thanks,
Mason
Ang
Sep. 19, 2010Mason,
I just started using Bridge primarily for archiving photos at work, so I can include metadata and access certain images that I need for my design projects quickly. I know you asked if people wanted to use just Bridge or both Bridge and iPhoto, and I guess I have a couple questions:
What are the benefits of using iPhoto and Bridge (wouldn’t it be better to just pick one and not have people get confused where their photos are)?
Can you set your camera to directly load images into Bridge? I am guessing as a default or something….
Also, I do lots of work on photos such as cropping, changing light in images, changing sizes, which I do in Photoshop. Once I do this I usually save it in the specific project folder that I need that particular image for. Is there a way I can be doing those steps and still go back to the original without wasting precious hard drive space? I do like to keep my original images in case I don’t want it cropped or I want it at a variety of sizes…should I be in the RAW format for that? (Just a thought.)
Thanks for any insight you may have.
Mason Sklut
Sep. 20, 2010Hey Ang,
As far as choosing between using both iPhoto and Bridge or just using one, my best suggestion is to look at your workflow. After reading about your workflow, I would recommend that you use Adobe Bridge for your main photo manager.
Primarily I say this because iPhoto can get quite annoying with its specific file structure. With Bridge, you have more freedom to edit in Camera Raw and revert back to the original photo later on.
In order to setup your camera to open Bridge when it’s connected to your Mac, go to Preferences and select General from the left side. Then check the option labeled “When a Camera is Connected, Launch Adobe Photo Downloader.”
To answer your last question, I would recommend you take a look at Camera Raw — this will make those tasks much easier — especially for retaining the original photo files.
To access Camera Raw within Adobe Bridge, right-click on an image in the Bridge photo browser and select “Open in Camera Raw.”
Thanks,
Mason
Tom Abbott
Sep. 30, 2010Hi Mason,
I just came across your very practical website while searching iPhoto.
I have a new 27″ iMac, with Mac OS X 10.6.4, iPhoto 8.1.2, Bridge CS4, and Photoshop Elements 8. I have been trying to install over 50 years of images: JPEGS, RAW and TIFF; 100 GB so far and another 100 GB to go. Previously, I edited in full CS2, but Essentials and Bridge should be OK now.
I was not able to install using your suggestion at the beginning of this tutorial as 10.6 does not seem to have “Originals” and “Modified” in the drop down menu. iPhoto does not seem to give all the info about an image (e.g. size, JPEG, RAW, etc.), so I have to open with Elements each time. I would prefer to work on images in Essentials/Bridge. What is the best way to catalog/library all of these images in one place? After laborious scanning of thousands of slides and negatives, all the images are scattered over many folders derived from different computers and backups which I transferred to the new iMac (I was terrified of losing them). There are many duplicates and I cannot work out which are the originals, JPEGS, TIFF, or RAW. Is there a way of deleting duplicates?
I seem to have gotten myself into a bit of trouble. Hopefully you can get me back on track, and suggest a workflow.
Regards,
Tom
Mason Sklut
Sep. 30, 2010Hey Tom,
In terms of cataloging your photos, I would recommend you just use Adobe Bridge. iPhoto is a very basic photo manager/editor. Unfortunately, this also means that there are limitations if you want to use iPhoto with Adobe Bridge. If you were using an older version of iPhoto, there wouldn’t be a problem. However, with the most recent version of iPhoto, the file structure/permissions within Finder are much different. Therefore, using iPhoto with Bridge won’t work well.
In terms of removing duplicates from your Adobe Bridge library, I would suggest using Duplicate Image Detector ($29). A free alternative would be to use Compare Folders with Automator. If you don’t like either of those, try using the Find feature within Adobe Bridge.
Thanks,
Mason
Aleda Freeman
Oct. 19, 2010I have 14,000 JPEG in iPhoto 4 on an eMac. I would like to transfer these photos to some image organizing software on a PC that could preserve the keywords and comments I have stored over the years. Is Adobe Bridge an option? Or am I limited to importing only the photos themselves into Bridge?
Mason Sklut
Oct. 19, 2010Hey Aleda,
Yes, go ahead and use Adobe Bridge if you already have it. That’ll work.
Thanks,
Mason
Amy
Oct. 21, 2010Hi Mason,
I’ve read through these discussions, and I’m still unclear about a couple of things and would really appreciate if you could help me out:
1) I’m trying to switch from iPhoto to Bridge, so that I will be able to find all my photos in Finder. I did as you suggested, by making an alias, but all of my photos are separated only by date and not album. If I continue to use Bridge to edit, should I just import straight to Bridge and make my own folders in Finder?
2) You said that the alias depends on what is in the originals folder, so does that mean that if my iPhoto crashed that all my photos in iPhoto would be gone? Also, when I stop importing to iPhoto and use Bridge instead, will that simply send them to my picture folder (that I specified) and has nothing to do with the iPhoto alias?
3) Finally, one more question: I’ve read other blogs that tell me absolutely not to touch the iPhoto pictures in Finder, but if I change around folders etc. in the alias, will that be okay?
Thanks a ton.
John Ferri
Oct. 21, 2010I followed your instructions and can now access my iPhotos in Bridge. However, I can no longer edit the photos in iPhoto. Did I do something wrong?
Mason Sklut
Oct. 21, 2010Amy,
1) Go ahead an import everything to Bridge and make your own Finder folders.
2) In iPhoto’s preferences, under Advanced, uncheck “Copy items to the iPhoto library.”
3) Yes.
Thanks,
Mason
Mason Sklut
Oct. 21, 2010John,
In iPhoto preferences, under General, make sure it says “In main window” next to “Edit photo”.
Thanks,
Mason
Paul Byrnes
Nov. 18, 2010Mason,
This is the kind of site I’ve been looking for for a while, so congrats and thanks. Two or three pressing problems to sort out, now that I have bought CS5 (still learning), on my MacBook Pro, OS X 10.6.5. I have 30,000 images in hard drive storage, many of which are duplicates, none of which I’ve properly archived and coded up with metadata, so I’m trying to get myself a system. I’ll look into your advice above on Duplicate Detector, but this leads me to wonder when and how to make the leap across from iPhoto, which is just so damn easy to use. I’m convinced I need to move over to Bridge or Lightroom or both. So my question is how you would order this process?
Should I eliminate the dupes on the HD itself first, thus reducing the load by about half, then import the whole lot to Bridge or buy Lightroom first and use that as my organizing program — because the second thing I want to do is start to fill in metadata and IPTC fields for my best images (some of these are used in newspapers). Do I really need Lightroom at all?
As you see, three different problems… And three more: Will the final import include all the edits made in iPhoto? Or just the RAW images themselves? And does that mean I say goodbye to using iPhoto forever? Only thing is that I use Mobile Me to share a lot of photos with friends, so how would I keep doing that?
Any advice gratefully received, and many thanks for being so generous with your expertise.
Regards,
Paul
Dave Thomas
Apr. 12, 2011Is there a way for an offline editor to out images IN ORDER in Bridge and export a folder to the editor and these photos still be in order?
Mason Sklut
Apr. 12, 2011Hey Dave,
I believe you can do this with Photoshop. Look into the Batch actions feature.
Best,
Mason
Donna
Apr. 27, 2011Thanks so much for your detailed step-by-step instructions, Mason. I have been trying to get my photos from iPhoto into Bridge for ages. I tried following other instructions I had found, but found them way too confusing. Thanks to you I now have a copy of all my photos on Bridge. Thank you!!!
Mason Sklut
Apr. 27, 2011Donna,
You’re quite welcome. I’m glad you found my tutorial easy to follow! Let me know if you need help with anything else on your Mac and I’ll be glad to help.
Best,
Mason
Kerri
May. 31, 2011Mason, I tried this suggestion but I have all my photos in iPhoto organized into albums by subject matter. When I use your alias trick, I lose all that categorizing. Is there anyway I can get that back when viewing them in Bridge? I searched for the keywords I have attached but Bridge does not see them, didn’t really expect it to. Any suggestions how I can JUST view all my waterfalls, for example, in Bridge?
Love your site, thanks for your help.
Kerri
Mason Sklut
May. 31, 2011Kerri,
Unfortunately, the applications are structured differently for categorizing because of the metadata.
You could export from iPhoto based on albums and sort that way in Bridge; otherwise, I don’t know of a way to do this using your iPhoto library within Bridge.
Sorry if I wasn’t able to help!
Best,
Mason
Doug
Jul. 12, 2011Hi Mason
Love your site. I am new to the Mac and trying to figure out which is the best way of organizing and editing my photos.
After reading through your tutorial, would I be correct in thinking that the best way forward for me would be to use Adobe CS or Elements and just stick to the one software for organizing and editing and forget about using iPhoto?
Thanks,
Doug
Mason Sklut
Jul. 12, 2011Doug,
You ask a great question that can only be answered by what your current needs are. Are you an advanced photo editor? If so, I highly recommend using Adobe software such as Bridge and Photoshop. However, if you are more inclined to just make basic touch-ups and crops, then stick with iPhoto. If you have any questions about editing your photos within iPhoto or Adobe software, please don’t hesitate to ask me.
Best,
Mason
Eric F
Aug. 9, 2011Thanks a lot for the advice. I really appreciate it.
Best,
E.
Mason Sklut
Aug. 12, 2011You’re very welcome Eric. Thanks for the comment.
prateek
Aug. 23, 2011Hi Mason – a big THANK YOU for your work on this site. It’s been a huge help!
Mason Sklut
Aug. 23, 2011Thank you!
Paul Weedon
Sep. 10, 2011Hi,
I am trying to follow the instructions at the top of the page, but when I get to step 4 I find that I don’t have “Originals” and “Modified” but I do have “Masters” and “Previews” are these the same? (I have a new iMac running Lion which may account for the differences)
Also in step 6 I do not have the option of “Make alias”, but I can “Duplicate” — is this the same? I don’t want to hold two of the same file as my wife won’t cope with uploading to iPhoto and copying to Bridge).
Mason Sklut
Sep. 10, 2011Paul,
Yes you’re correct. The new version of iPhoto is different than the one I was using in my tutorial. That’s why Originals and Modified are now renamed Previews and Masters.
In Step 6, making an alias would be preferable over duplicating the folders. You’ll waste hard drive space if you duplicate unnecessarily.
Janessa
Oct. 17, 2011Mason,
Thanks so much for you help with this confusing problem! I’m new to Mac and finally bought a nice DSLR and was using iPhoto. Now I think I need to use something a bit more complex. But I had the same problem as Paul. Since I’m using Lion and iPhoto is improved, there’s not the option to make an alias. What should we do?
Thanks!
Janessa
Mason Sklut
Oct. 18, 2011Janessa,
I would suggest using one photo editing program at this point. Unfortunately, Apple has made it more difficult to use iPhoto with another program such as Adobe Bridge. For this reason, I would recommend going with a professional photo editor such as Lightroom, which I’ve found to be a great investment, especially since you’ll be taking lots of pictures with your new DSLR!
Best,
Mason
Jeff
Oct. 19, 2011Mason:
Great site. I, too, am facing the problem with the Lion version of iPhoto missing the alias option on the folders within the iPhoto library. I’d use Bridge exclusively on the Mac, but I want to utilize the PhotoStream feature of iCloud for the photos I take with my iPhone. It looks like you need to use iPhoto on the Mac side to “receive” the stream .. I don’t think Bridge can access them directly.
Any ideas on workflow in this situation?
Lisa
Oct. 19, 2011Mason,
Do you use Bridge to create photo galleries? I’ve just updated to CS5 and found that Photoshop no longer has its easy web gallery function. The Bridge web galleries are very slick, however, a few key things seem missing; eg. doesn’t seem to be a way to add individual captions for each image. The “airtight” templates allow that but only by modifying the “metadata”, and they don’t seem to allow you to put your name/logo, navigation etc. or other identifying header.
The other issue is that because flash is not always available on ipads and phones, these web galleries won’t always work. Any suggestion for a photo gallery plugin or something else that will solve these issues?
Mason Sklut
Oct. 20, 2011Lisa, if you want full customization, I would recommend SlideShowPro:
http://slideshowpro.net/
Thanks,
Mason
Mason Sklut
Oct. 20, 2011Jeff, I’m not sure the best way to go about this…. Ideally, you would have one photo editor for all of your needs. Can you make a dedicated folder in Finder for the pictures on iCloud and have Bridge “receive” that?
MBrown
Dec. 11, 2011Thank you so much for this info. I didn’t expect it to work but it did. I am using iPhoto ’11 and it still worked perfectly. I could not open my photos from Bridge after upgrading to iPhoto ’11 but now I can. Thank you!
Mason Sklut
Dec. 12, 2011You’re welcome! I’m glad you found my tutorial helpful!
Bina
Jan. 25, 2012Hi Mason,
Love this site. Thank you for all your help. I have a question regarding editing in Bridge. How come my edited pictures go back to their original format if I post them on Facebook or email them? How do I over come this?
Many thanks,
Bina
Jeremy
Feb. 23, 2012Thanks!
I was searching the web for a solution to use both iPhoto in Bridge, this works perfect!
Rob
Feb. 23, 2012Hello,
With 10.7.3 the ALIAS option doesn’t appear when selecting MASTERS and PREVIEWS – is there a way around this?
Thanks,
Rob
James
Mar. 9, 2012Hi Mason,
I’m having the same issue as Rob – the ‘alias’ option is shaded so cannot be selected when selecting ‘Master’ and ‘Previews’
Any help would be much appreciated
Thanks
James
Kari Quaas
Mar. 10, 2012Thank you! I was scared when I copied my files and they were only showing as JPEGs. Now I have the RAW files and can work my magic. Thanks so much for the tips.
Siska
Mar. 20, 2012Hi Mason,
At the moment I’m organising my photos in iPhoto and like to make the iPhoto albums. Recently I bought Adobe Photoshop CS5 and I’d like to edit my photos in Bridge/Camera Raw and Photoshop, but still like to make the iPhoto photo albums with the edited photos. Would that be possible and if yes, how should my work flow be?
Hopefully you can help me out, I’m confused. Thanks!
Anne
Apr. 4, 2012Hi Mason
I’m dying to use your instructions to end my misery with the Bridge/iPhoto problem but —when I open the Package Contents in the iPhoto Library File I can see the two files Masters and Previews and also two alias files named Modified and Originals. I don’t know when or how the aliases got there and they do refer back to the Masters and Previews folders. Could I just move theses aliases, as the option isn’t there to create new ones?
Although I do like iPhoto I think I might just use Bridge if, and when, I get this sorted.
Hope you can help, thanks in advance.
Anne
Mason Sklut
Apr. 20, 2012Anne,
Yes, I would try to move these alias folders if you aren’t able to create new ones.
Best,
Mason
Mason Sklut
Apr. 20, 2012Siska,
The best way to implement iPhoto in this workflow would be a “photo viewer.” To do this, go to iPhoto > Preferences. Click on the Advanced icon, and make sure to uncheck “Copy items to the iPhoto Library.” This will essentially allow you to use iPhoto to view and catalog your photos into albums without creating another photo library. When you want to add pictures to iPhoto from Bridge after you make edits, just drag them into iPhoto.
Best,
Mason
Mason Sklut
Apr. 20, 2012Kari,
You are quite welcome! I’m glad you have found my website useful.
Thanks,
Mason
Mason Sklut
Apr. 20, 2012Rob,
Unfortunately, the iPhoto file structure has changed in the most recent version and doesn’t allow users to have permission to view Masters or Previews in Finder.
Best,
Mason
Mason Sklut
Apr. 20, 2012James,
Unfortunately, the iPhoto file structure has changed in the most recent version and doesn’t allow users to have permission to view Masters or Previews in Finder.
Best,
Mason
Mason Sklut
Apr. 21, 2012Bina,
This is due to the way that Bridge works… When you make changes, it only shows those changes within Bridge. You must export from Bridge (File > Export to > Hard Drive).
Best,
Mason
Bonnie
Apr. 21, 2012I got the folders to appear in Bridge, but when I upload new photos to iPhoto the pictures do not automatically show up in the Alias folders. Am I doing something wrong? I followed your directions exactly…I think.
Chris
May. 22, 2012I don’t have a “make alias” option when I right click. Any ideas?
Mason Sklut
Jul. 1, 2012Chris,
Have you tried going to the File menu in Finder? There’s also a “Make Alias” option there if you can’t get it on the right-click. Make sure you’ve selected the folders you want to make an alias from.
Best,
Mason
Patrice
Jul. 8, 2012Hello,
I followed the instructions from the screen shots provided and moved the Originals and Modified folders into the bridge, and I can now view and edit my pictures stored in iPhoto. But now I’m having a new problem. After moving those photos, I cannot enlarge the thumbnails of them in iPhoto anymore. It keeps showing an “!” whenever I double click on a thumbnail. I am using CS5 and iPhoto 09. I don’t edit photos often, so I wanted to keep using iPhoto because I organize my pictures there. Can you help me figure out how to fix this?
Patrice
Ellen
Nov. 13, 2012Hi Mason,
I would like to move some of my photos from my iPhoto library so I can work on them in Adobe Bridge. I don’t want to move my whole iphoto library yet. Is the best way to do this through Export in iPhoto?
Since I don’t want duplicates on my Mac, would I then just delete the images I’ve exported from the iPhoto library? Thanks!
Ellen
Peggy Flory-Dean
Nov. 29, 2012How do I put my photos in Lightroom? And can photos be in Lightroom and minibridge? I have CS6
Kari Sinkko
Jan. 11, 2013Hey Peggy,
http://lightroomkillertips.com/2010/video-moving-from-iphoto-to-lightroom-3/
I had that issue too, I quite like lightroom.
Kari
Leeanna
Mar. 2, 2013I just purchased a MAC and Photoshops CS6. I am a beginner in the mac world so I am just learning how things get moved around and are found. Before I got my CS6 software I downloaded from SD cards several photos and they went into iphoto. When I go to open them in CS6 it gives me a message that it can’t open it because it doesn’t recognize the file. I found this tutorial of yours thru a google search, tried it but it says it can’t find the file. I did see that I could CTRL click and have a thumbnail open in CS6 but I would love to have them all in Bridge. Can you tell me from a beginners viewpoint how I can get this fixed. I did go in a change preferences about how they import but I still have all these photos out there not in Bridge.
Thanks so much!
Sabine
Mar. 9, 2013Hello Mason
Just discovered your website and your very helpful and interesting answers. As you can imagine, I have a question (smile)
I have a similar problem as Patrice specifies in his July message – unfortunately I couldn’t find your answer to it. I exported pictures from iPhoto to Bridge and now I get that funny triangle with exclamation point when trying to open the thumbnail to full screen, plus I can’t find the pictures in Bridge even though I edited them via Camera Raw and saved them. What can I do to get access again to my pictures in iPhoto?
Looking forward hearing from you as I truly wish to work my pictures of my latest trip.
Thanks in advance and keep up the great work.
Sabine
mick
Apr. 18, 2013My raw photos are imported iphoto. The events have a mixture of raw and JEPG. From iphoto i external edit in raw. All was working well until my last 600 raw photo loaded on. When i click edit in iphoto the photo goes blurred and the adjustment slides are blank and do thing. When i then click the same photo to edit in RAW it won’t take me there. Now i just open up Bridge and work from there directly. Can this iphoto be fixed. I have a feeling when i was in bridge i delated photos as well as in iphoto.
Also when i try you trash these iphotos i can but it does not show in the desktop bin. All this happens only in my last event. All the others seem to work as before.
Love to have some feed back on the, thanks heaps.
Mick
Jack
Aug. 1, 2014Create a “Smart Collection” in the collections section and point it towards your “Masters Folder”. Choose your filter by “file name” and choose the “ends with” option and add the file extension (jpg, jpeg, etc.). It will scan the folder and update its thumbnails