Many Mac users, including myself, know that Finder’s CD/DVD burning capabilities are just not there yet in terms of user-customizable options. When it comes to CD and DVD burning some highly useful options include: multiple burning sessions, CD-Text for MP3 files, DVD-audio, adjusting permissions, personalized DVD-menus, conversions, and much more. With the fantastic Mac app called Burn you may do all of the above at a very nice price — free — and it’s open source as well, which is nice for any developers out there willing to help. If you would like a copy for yourself go check it out — you won’t be disappointed. There are other Mac apps like Roxio Toast which have similar features, yet the options are more advanced and carry a larger variety of media types. For the price tag, you really cannot beat Burn.
Microsoft has been a little slow with updates not only on Windows but also on their Mac products. Windows Media Player has not been updated since Mac OS 9. With Mac OS X Tiger on all the new Intel Macs, using Windows Media Player for Mac OS 9 wasn’t an option. Well, thankfully with lots of patience, Microsoft has released Windows Media Components for QuickTime. Mac users will now be able to play any type of Windows Media (.wma and .wmv) on their Mac, through QuickTime Player. Another great feature is that it will play all videos in your browsers as well as Apple’s Mail application.
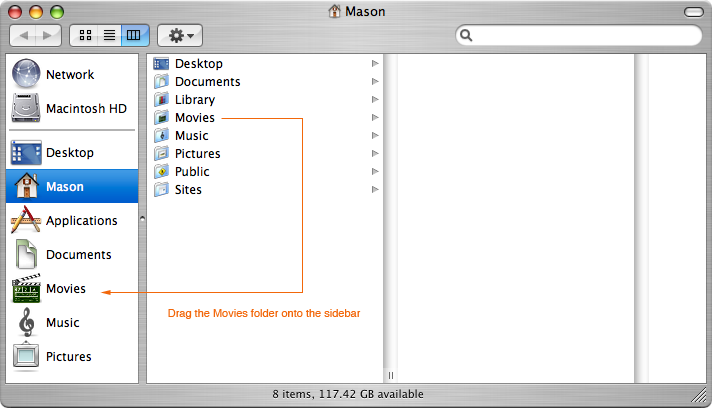
Since I don’t use iMovie that much, I deleted my “Movies” folder out of my Home folder and the sidebar in Finder. Later, I realized I liked having that folder there. After trying many ideas, one finally worked:
- Add a new folder in Finder by going into the File menu and selecting New Folder. (Skip this step if you already have the Movies folder in your Home folder).
- Drag the Movies folder from your Home folder onto the Finder sidebar.
- This will also work with other folders such as: Documents, Music, and Pictures.
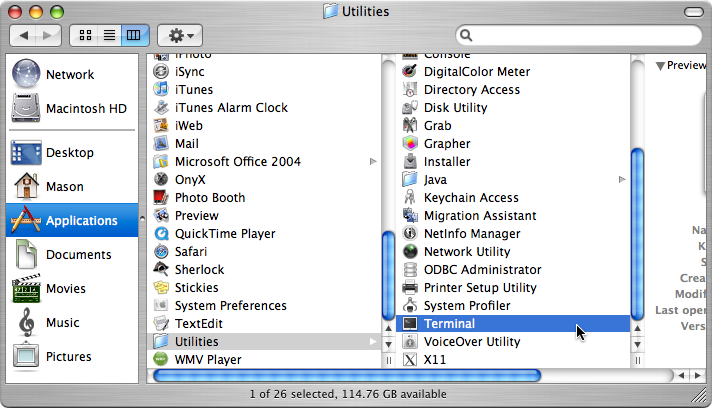
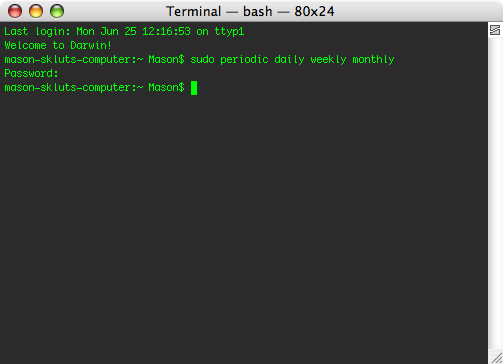
To perform a few simple maintenance scripts on your Mac, I would recommend just using Terminal. Although your Mac automatically runs these maintenance scripts at 3-5 AM (if your Mac is on), it is still a pretty good idea to run these scripts manually just to clear any problems up you may be having.
Here are instructions on how to run maintenance scripts on your Mac:
- Go to Finder > Applications > Utilities > Terminal.
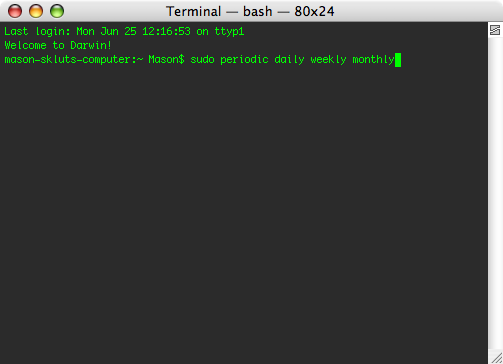
- When Terminal loads up, type in
sudo periodic daily weekly monthly - Once you have typed all of that correctly, hit the Return key.
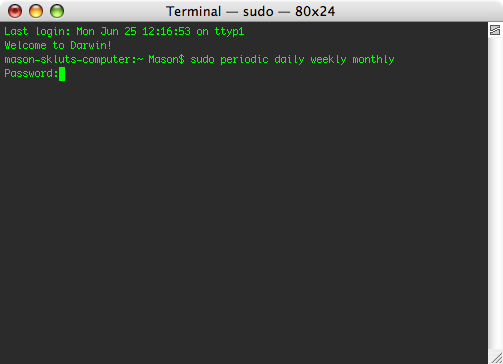
- After hitting the Return key, you will be asked for your password.
- Type your Admin password then hit the Return key.
- Let the scripts run until they are finished.
There will be a time in every Mac user’s life where they will have duplicate images in their iPhoto library. I am aware that when importing images into iPhoto, there is an option to skip duplicates, but this only works while importing, not after the pictures have been imported. When I had to restore my iPhoto library from my external drive, iPhoto grabbed my originals folder and the data folder. For some reason, this caused more duplicates than I could ever have imagined. I found a miraculous AppleScript-based application called iPhoto Diet which will safely remove the duplicates and place them in iPhoto’s trash or into a separate duplicates folder within iPhoto. Trust me, this is an application you want to keep around for that one time you’ll need it.