Included with all new Macs is a neat little app called OmniOutliner. It serves as an “outliner” application which helps you put together your ideas. When you first open OmniOutliner, you may be shocked by how plain and simple its interface is. After this article, you will be surprised at all the power that OmniOutliner has. My main usage for this application is to make and manage my to-do lists — and man does it do a great job of doing that.
Go ahead and open up OmniOutliner.
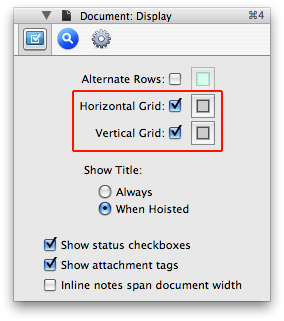
Click on the “Inspect” button in the top right corner, or just hold down the Shift, ⌘ (Command), and “I” keys.
In the document that is open, select everything by holding down the ⌘ (Command) and the “A” keys. Now in the Inspect panel, go to the “Document: Display” section. Check off “Horizontal Grid” and “Vertical Grid”.
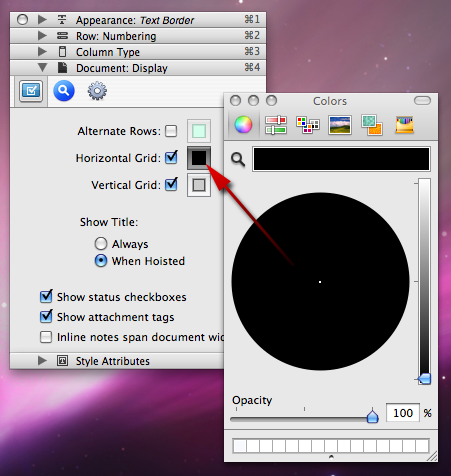
If you’d like to change the color of the grids, just click on the small color box beside “Horizontal/Vertical Grid” in the Inspect panel. Then select your color using the Color window (personally, I prefer a light gray color because it’s easier to look at).
One of the key steps in setting up a to-do list is proper organization.
The best way to organize your to-do list is with “categories”, such as “Other”, “To Buy”, “Projects”, or “Organize”.
To make these categories, just type the word in the first line with bold (hold down the ⌘ (Command) + “B” keys) print followed by a colon (“:“).
After you’ve typed the category title, hit the Return key, then the Tab key.
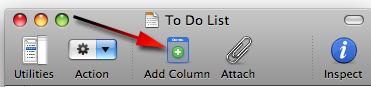
To add a column for due dates, just click on the “Add Column” button.
Now just type in your due dates in that extra column.
If you plan to use OmniOutliner a lot for one to-do list, I recommend you set it up to open that to-do list every-time you use OmniOutliner.
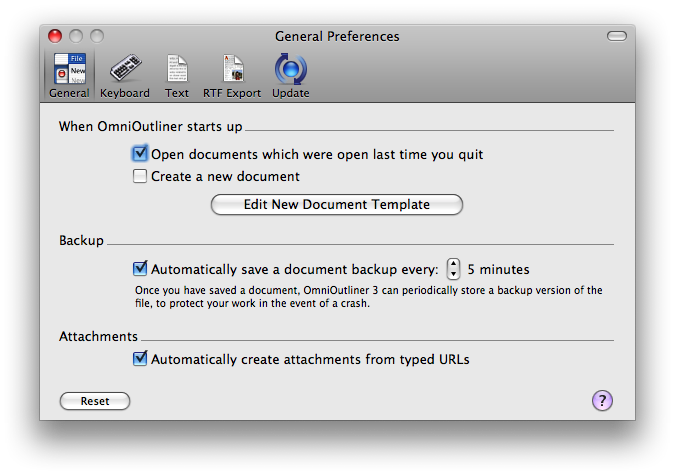
Just hold down the ⌘ (Command) and “,” keys and in the preferences window, check off “Open documents which were open last time you quit”.
That’s it! You can do as much customization as you want, but I prefer to keep my to-do lists very simple and easy to follow.
In the new version of iWork ’08, Numbers was included along with the traditional Pages and Keynote applications. Numbers is basically Apple’s version of Microsoft Office Excel. In this article, I am just going cover to basics you need to give you a general idea of how much Numbers is capable of. To experience more of Numbers functionality, I highly recommend you use the Inspector panel (hold down the Option, ⌘ (Command), and “I” keys to activate it) along with the built-in Templates to truly take advantage of making graphs.
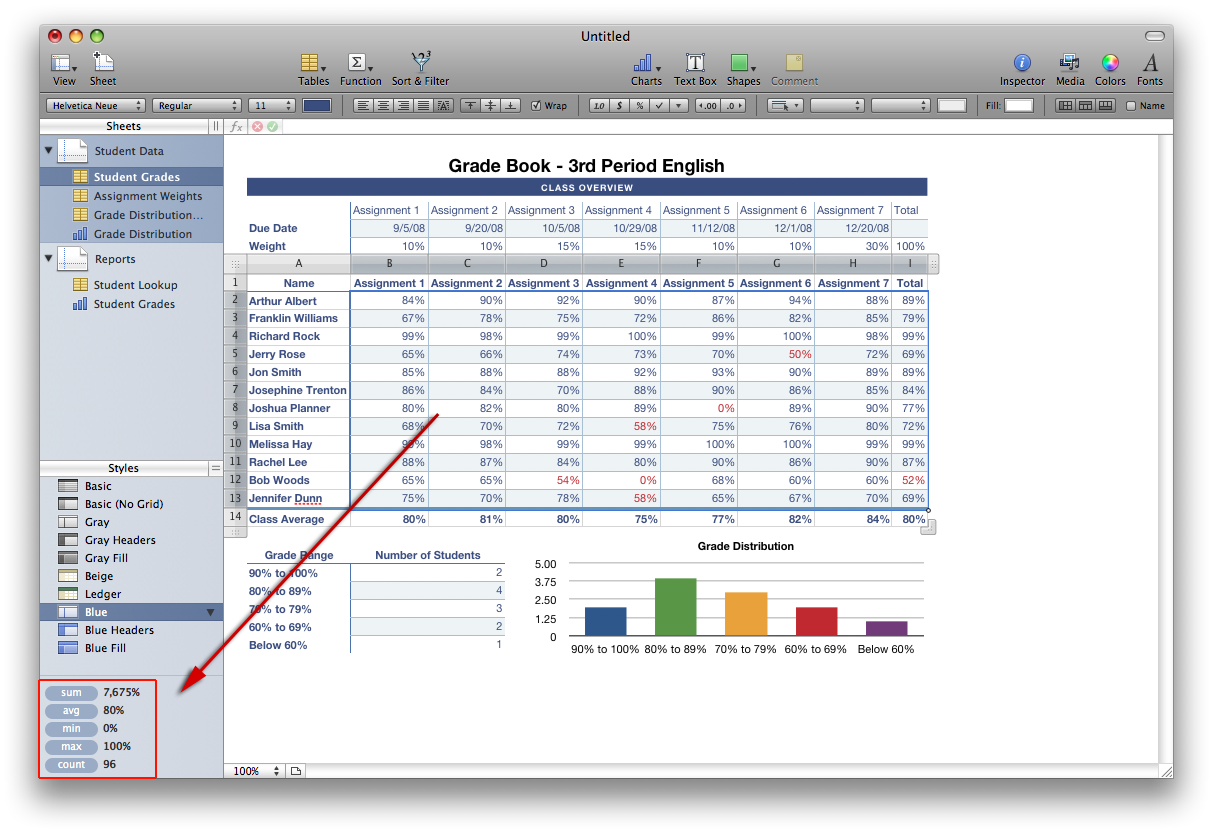
Calculating Graph Data
When there is a graph with data filled in it, you can easily find out everything about the graph such as sums, averages, minimums, and maximums within a few clicks.
To start, select the first item in the graph and hold down the Shift key.
Then click anywhere else to finish making your selection.
Instantaneously, you’ll notice results appear in the bottom left sidebar in Numbers.
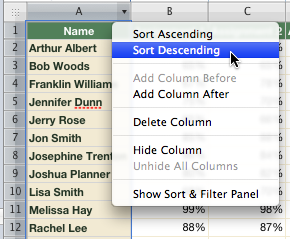
As I mentioned previously, to select a specific range on a graph clicking once and hold the the Shift key, then click one more time to finalize your selection.
Hover your mouse pointer over a graph until the column headers (“A”, “B”, “C”) appear.
When you put hover your mouse pointer over one of the columns, you should see a small arrow appear.
Click on the arrow, and choose “Sort Ascending” or “Sort Descending” to change the order of the data.
When it comes to writing, I always like to be productive with my time. Thankfully, Microsoft Word makes that incredibly easy with the built-in AutoCorrect feature. AutoCorrect is very similar to TextExpander, in that it will complete your abbreviation into a word/phrase. Here’s how:
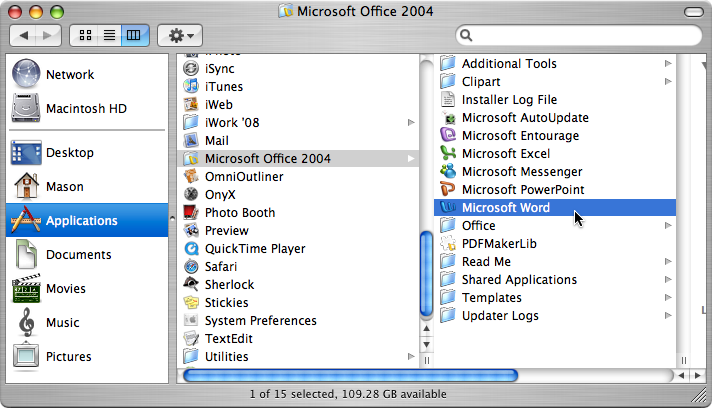
Open up Microsoft Word from your Applications folder.
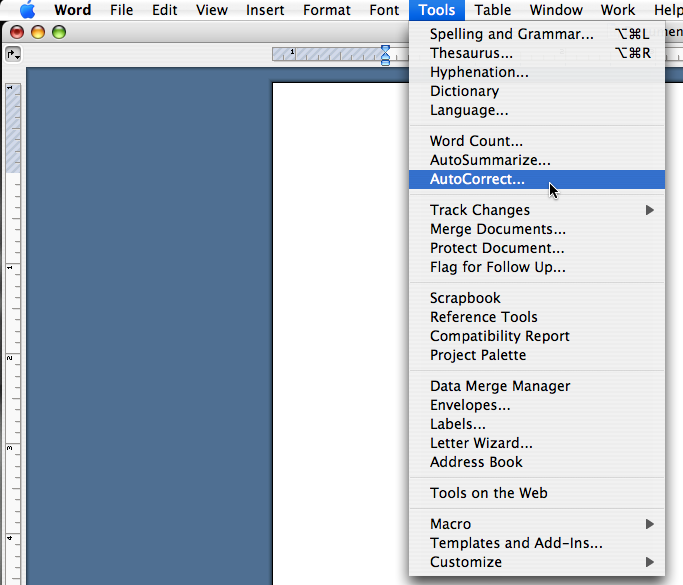
Go up to Tools in the menubar and select “AutoCorrect” from the drop-down menu.
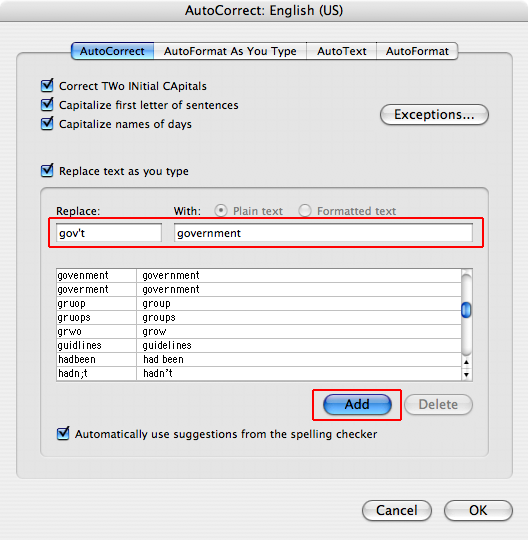
A pop-up window will appear presenting you will the settings for AutoCorrect.
In the middle of the window, look for an empty field titled “Replace” above it.
Type in the abbreviation or word that you would like to use.
In the empty field to the right of that, titled “With”, correctly type in what you want Microsoft Word to replace your abbreviation or word with.
Once you’re finished up with that click on the “Add” button and choose OK to close the window.
Hope that made your experience with Microsoft software on the Mac a better one!
One of the cooler things you can do in iTunes is share your music with others. This allows other users on your local network to listen to your music. The only problem is that you can only listen to their music and that’s it. You can’t put it in your own iTunes library or on your iPod. I used to use an app called ourTunes, which allowed you to view and download songs from another users’ library on your local network. This application worked great until iTunes 7 was released. Since then, it stopped working. I found a much better app out there called MyTunesRSS, which uses an open port on your Mac to share your music. Here’s how to use MyTunesRSS to share your music:
After you’ve downloaded MyTunesRSS, it should appear on your desktop. Click on the MyTunesRSS folder and open up up MyTunesRSS.
Once MyTunesRSS opens up, it will set itself up, so you may have to wait a few seconds.
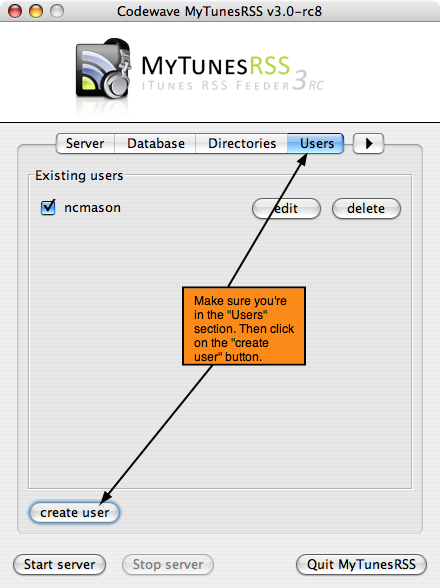
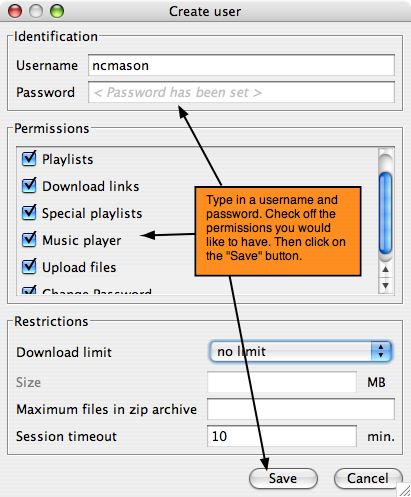
In MyTunesRSS, go to the “Users” section and click on the “create user” button.
Now, create a username and password.
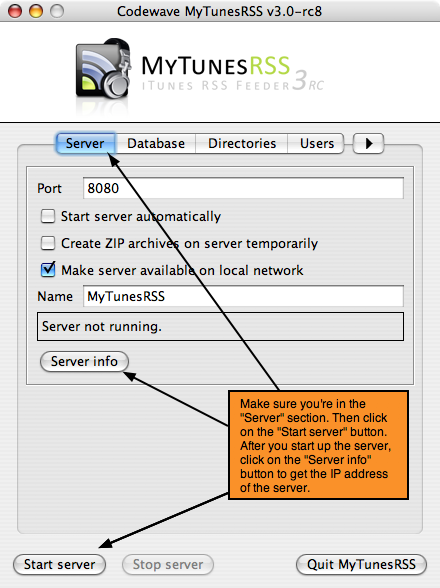
After you have saved your settings, go back to the “Server” section in MyTunesRSS.
Click on the “Start Server” button.
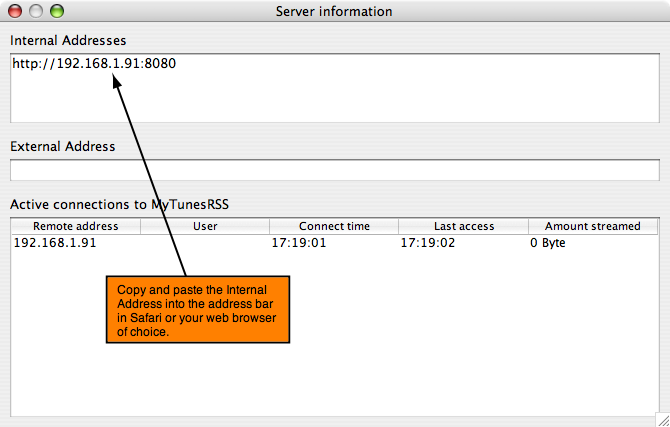
Then, click on the “Server Info” button.
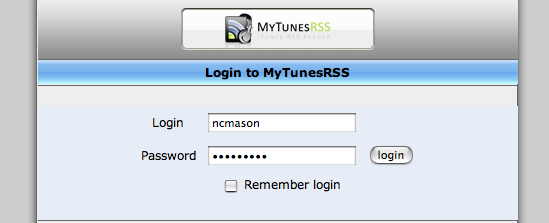
Copy and paste the internal address into a web browser.
In your web browser, you should see an login interface appear with a MyTunesRSS logo.
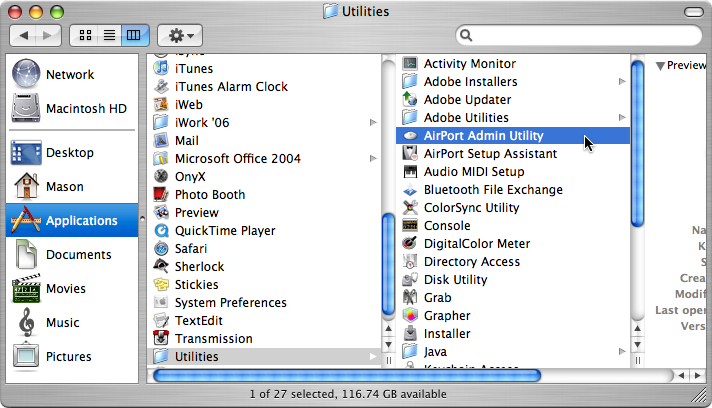
If you’re using an AirPort Express/Extreme to go online, you need to enable Port Mapping.
To do so, open up AirPort Admin Utility in the Applications >Utilities folder.
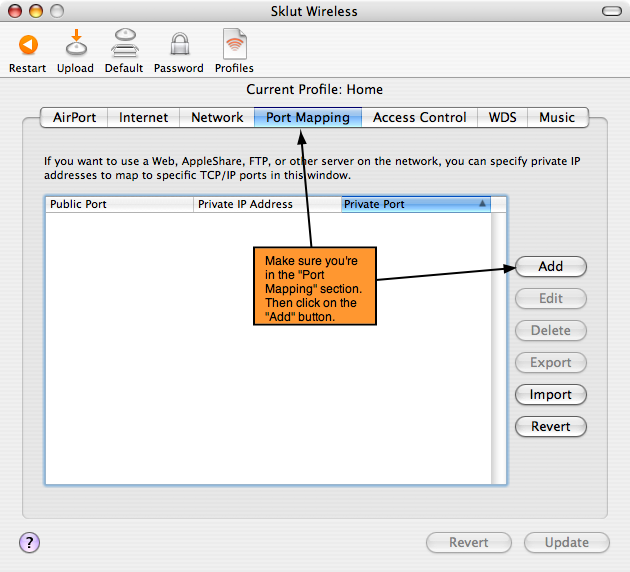
Then, go to the Port Mapping section in the AirPort Admin Utility and click on the Add button.
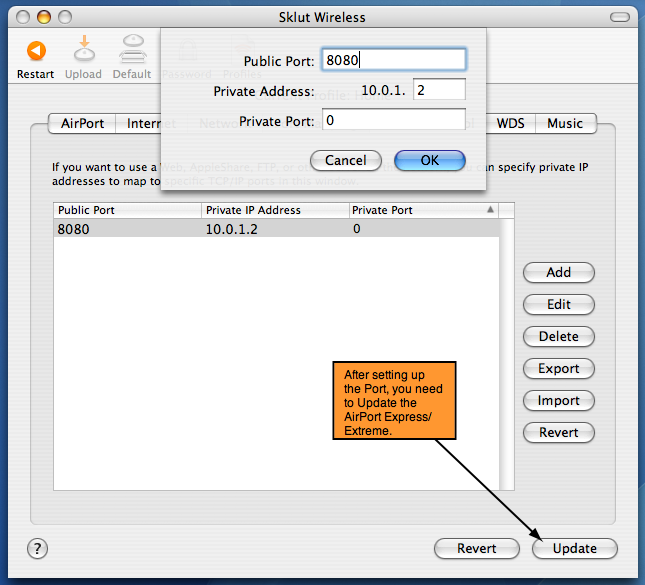
In the drop-down menu, put in “8080”.
For the Private Address, you need to enter “2”.
Then skip the Private Port field.
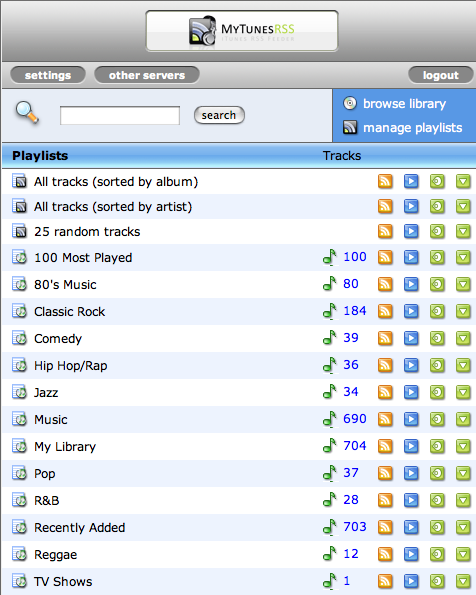
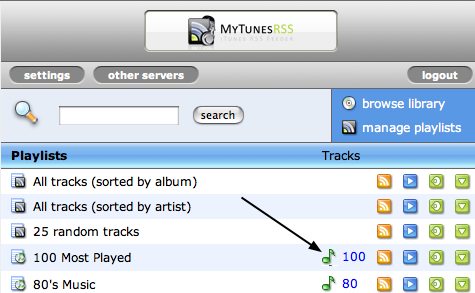
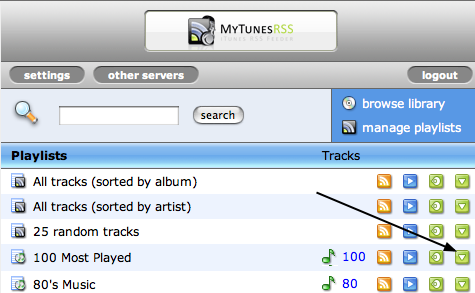
Once your online with MyTunesRSS server, you should see your music playlists.
There are several options in the interface:
The first is a green icon that shows the number of songs in the playlist.
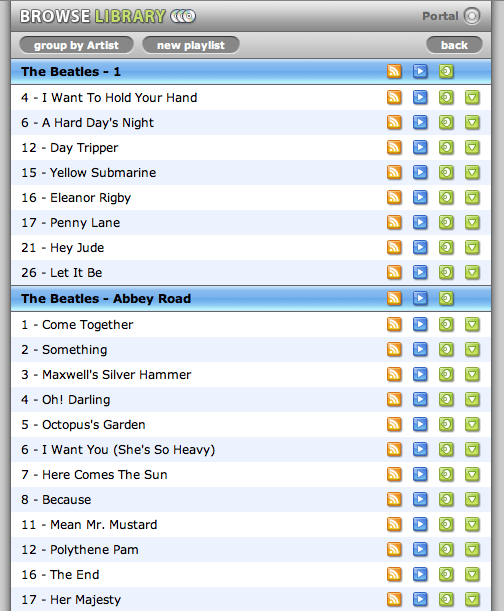
Use this if you want to browse through all the songs in a playlist.
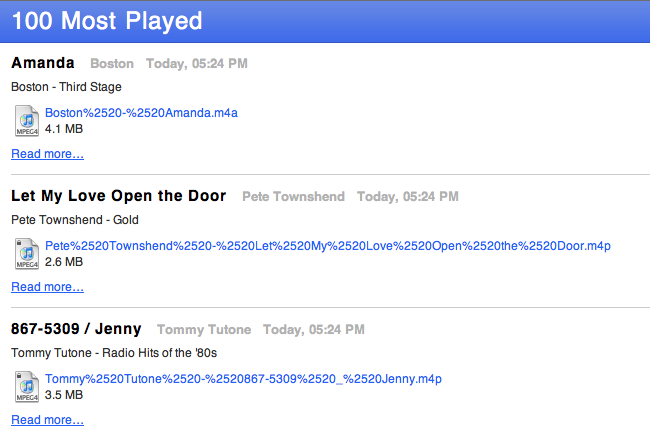
The second is an orange button with a radar-like icon.
This will makes an RSS-like page for all of the songs in that particular playlist.
The third is a blue button with a sideways triangle on it.
This will create a live-streaming playlist on your desktop. Double click on it to open it in iTunes.
The fourth is a green button with a volume icon on it.
This will make a pop-up window with a Flash-based playlist where you can play all of the songs from the selected playlist.
The final one is a green button with an upside down triangle icon on it.
This will download all of the songs from the selected playlist into a folder onto your desktop.
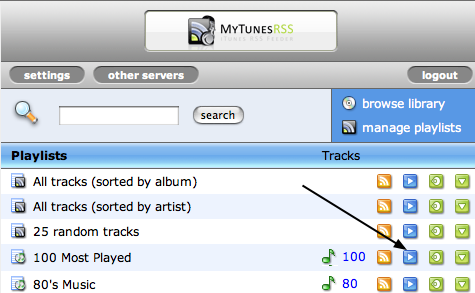
To download a single song:
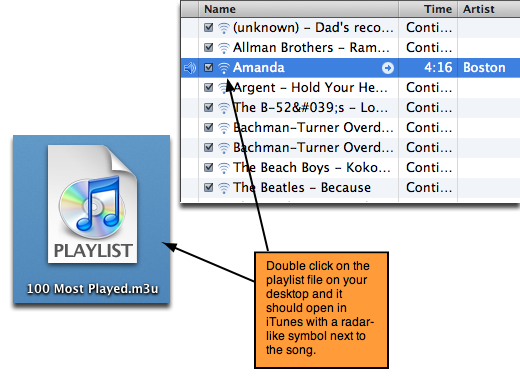
Click on the orange button, and an RSS-like page will open.
You should see a link to the song on the page. Right-click on the link and select “Download Linked File”.
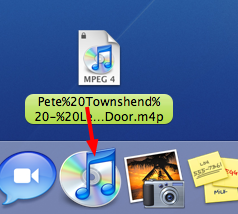
The song should then appear on your desktop.
Drag the song file into the iTunes dock icon and iTunes will automatically import it into iTunes.
Then you move the song off your desktop and into the trashcan.
iChat is a great instant-messaging app that I happen to use quite a bit with family and friends. There is a lot that you can do with iChat such as: video conversations, audio-chats, send files, and much more. There are some options that I wish would show up in iChat but they just don’t. One, for instance, is that small preview image of yourself that shows up in the video conversation window. Some other options are the ability to send SMS messages, double click on an image to open in Preview, and the ability to have tabbed chats. If iChat had these features, it would be the perfect client for instant-messaging. Surprisingly, you can turn iChat into a more featured iChat, by installing Chax. Chax is a plug-in for iChat that enables features like: tabbed chats, show animated user icons, hiding the audio/video status icon, message notification in the dock, custom fonts, Preview integration and more.