One of my biggest concerns when I first got Lightroom was how I was going to order prints online as I was able to do with iPhoto. Surprisingly, this task can be done fairly easy thanks to Lightroom’s exporting features. Here’s how:
Open up iPhoto and to Preferences > Advanced.
Make sure “Copy items to the iPhoto Library” is unchecked, this prevents unnecessary space from being taken up on your hard-drive by duplicate pictures.
Now, go to Lightroom and select the images you would like to order prints with.
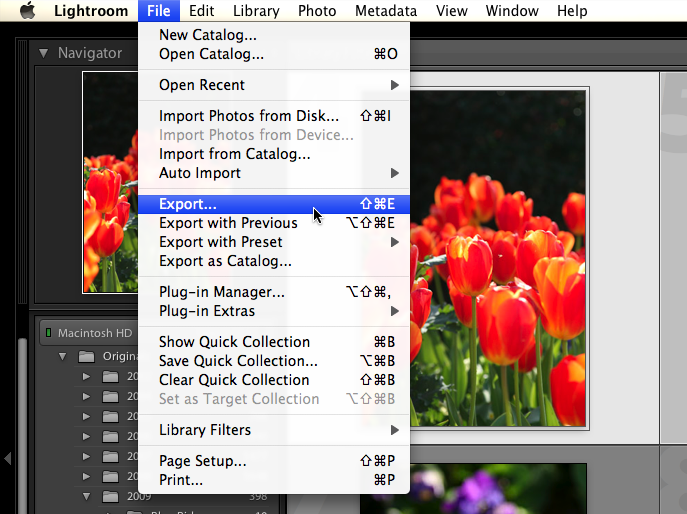
After selecting those pictures, go to File > Export…
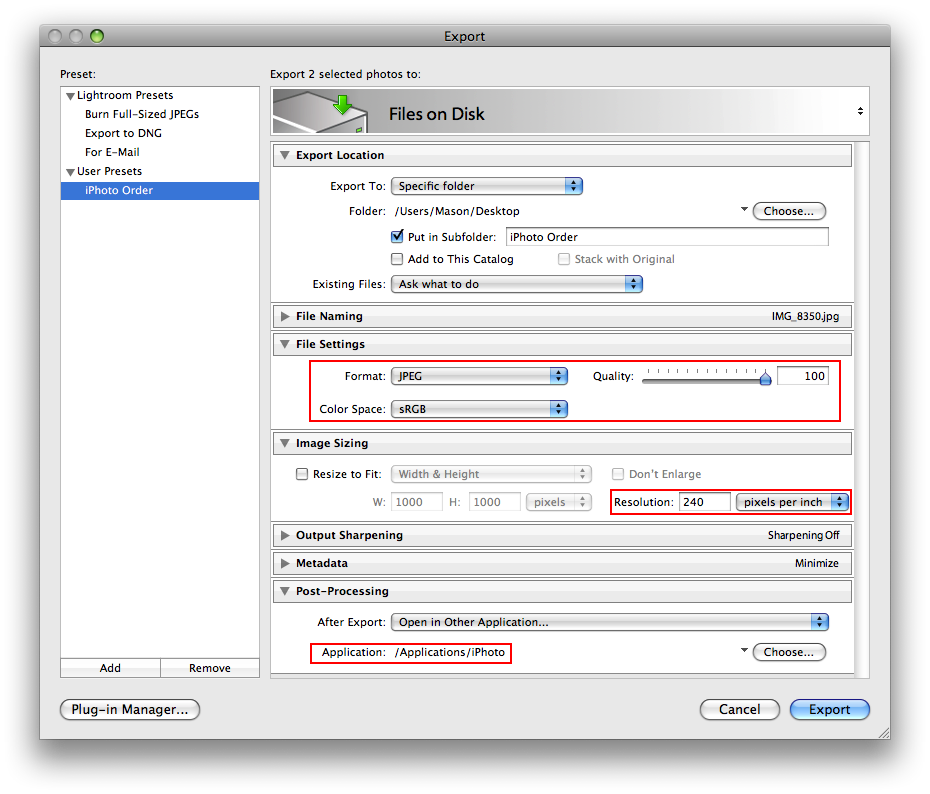
In the Export window that appears make the following changes (leave the other settings as they are):
Under Export Location: select Specific Folder (Choose Desktop) in the Export To drop-down menu and check off “Put in Subfolder” (titled iPhoto Order).
Under File Settings: make sure to select JPEG in the Format drop-down menu, drag the Quality slider to the max (100), and select sRGB under the Color Space drop-down menu.
Under Image Sizing: uncheck “Resize to Fit” and type in 240 (recommended default by Lightroom) for the Resolution.
Under Post-Processing: choose “Open in Another Application” under the After Export menu; choose iPhoto.
To save you time in the future, save these settings as a Preset by clicking the “Add” button in the bottom left corner.
Then click the Export button.
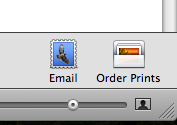
Once the pictures have been successfully imported in iPhoto, select them and choose the “Order Prints” button in the bottom right corner on iPhoto.
One of the reasons why I purchased an iPod touch was for the ability to watch movies. The screen was much bigger on the iPod touch making it a lot easier to view a full-length movie. I have many movies on my computer as well as a large DVD collection, all of which I wanted to somehow get onto my iPod touch. Thanks to a wonderful app called Handbrake, I can now easily convert DVD’s and other movies on my computer to use on my iPod touch. Not only does Handbrake convert DVD’s to the iPod format, but it also converts to PSP, Xbox 360, AppleTV, iPhone, and for use on your computer. Here’s how:
Download the Handbrake application if you have not already done so.
Insert a DVD into your computer or locate the movie on your computer you would like to convert.
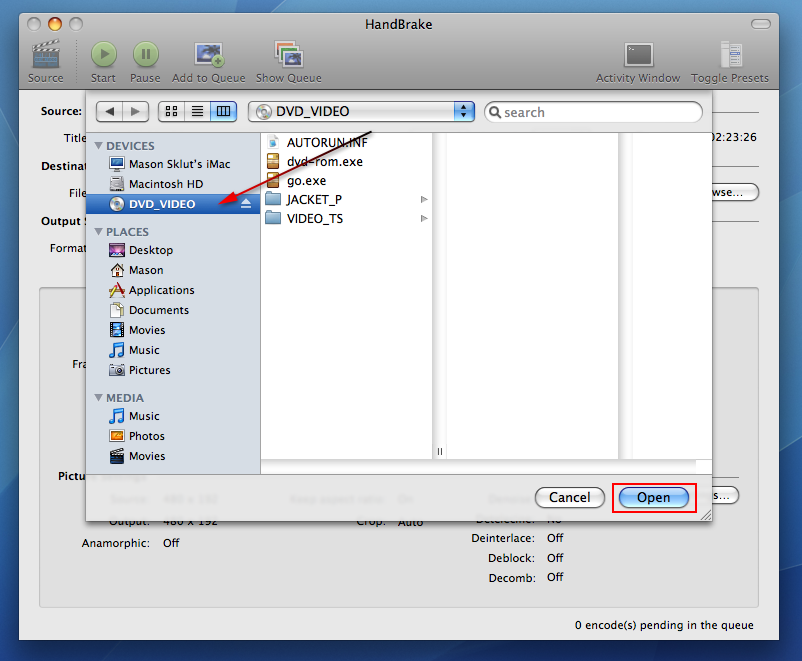
Open up Handbrake and select the movie.
It will scan the movie and then show the information about the movie concerning the time, chapters, and titles.
If you are using a TV series DVD (e.g. Seinfeld) you have to be very careful about how to select the titles because there are multiple episodes on each disc.
In this situation, select the title number from the “Title” menu, change the name of the file name under “Destination” to correspond with that title number (e.g. “Users/Mason/Desktop/Movies/Seinfeld Episode 1” for Title1, etc). Then, you must click “Add to Queue” after each time you change the name and title.
Usually, there are out-takes, extras, or what not towards the end of most TV series DVD’s. Make sure don’t select those if you don’t want them.
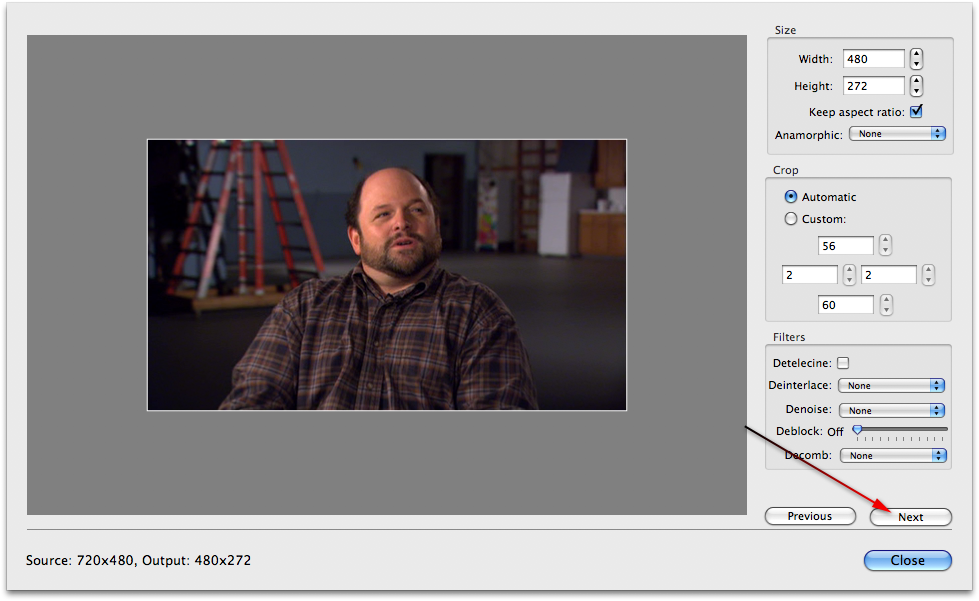
To make sure you are selecting the right title numbers, just look at the time of the title (usually short times) and if you still aren’t sure, click the “Picture Settings” button and it will show you snapshots of that title.
Click the “Next” button in the bottom right corner in the Picture Settings window and you can browse through the scene to double-check if it’s the scene you wanted.
After you have added all the correct titles and corresponding file names to the queue, select the “Toggle Presets” button and choose the format you want to convert the video to.
For example, I would choose Apple > iPhone & iPod touch if I wanted to use the video on my iPod touch.
Once you’re done with that. click “Show Queue” then click “Start”.
The biggest trick is to make sure you are always choosing the right titles and then adding them to the queue with the right file name in sequential order.
Movies that already on your computer are ready to convert once you’re in Handbrake: just choose a format (iPod, PSP, etc), a destination for the converted movie to go, and then click Start.
This past year, I’ve been doing lots of reading mostly from two of my favorite authors: Daniel Silva and David Baldacci. Due to how books are printed nowadays, I find it much easier read a hardcover book than a paperback. The font size and line spacing is much larger with hardcover books. The only setback with purchasing hardcover books is the hefty price tag. Thanks to the online store, Amazon, purchasing hardcover books has never been easier. This is more of a personal experience I’m going to share with shopping on Amazon. First off, let me tell you that buying used books is not a bad thing. In fact, I’ve purchased over 15 used books these past two years on Amazon, saving me well over 200 dollars. Here are several pointers I have about finding the best deal for used books for when you go onto Amazon.
Search for the book that you would like to purchase.
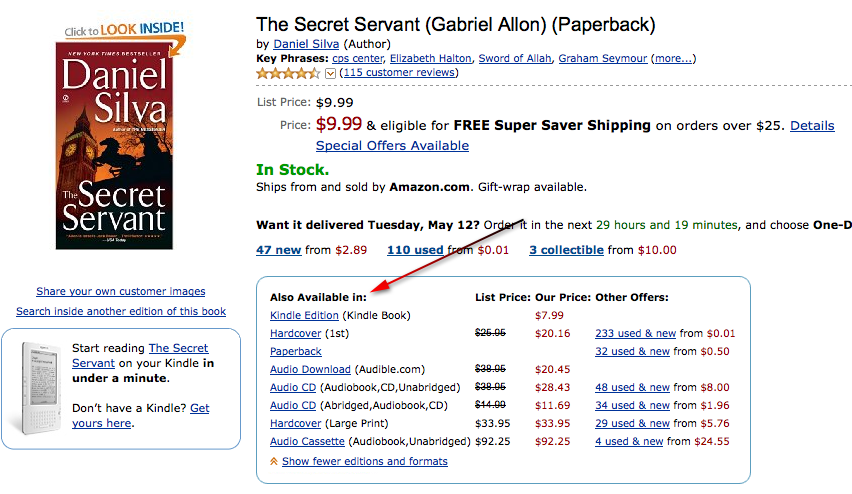
When you go to the page that shows the book you want, look for a round box that says “Also Available In”.
If there is not a box, then just click the used link.
The reason I like to use the box is that is where you can find the hardcover versions.
When you see the version of the book you like, just click the link next the type of book you want.
For example, if I wanted Hardcover, I’d click the link in the Other Offers column that is directly across from “Hardcover”.
After you click that link, a new page will load with all of the used, new, and collectible versions of the book.
If you want the best deal, browse through the used/new selection and try to find one under a dollar — most of the time you will.
Even is if it is a used book, most are in readable condition (just read the user comments to make sure).
Once you’ve found the book, just add it to your cart.
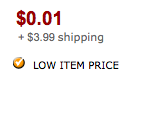
If you do the math, buying a brand new hardcover would have cost me about $25 at a local bookstore. Instead I payed $4 for a used book ($0.01 for the book + $3.99 for shipping). Pretty good reason to use Amazon, right?
Torrenting is a very controversial topic nowadays, especially with music piracy. For some people, like myself, I strongly believe torrenting should be allowed. One example where torrenting is helpful is for students. There are times when a student does not want to put out several thousand dollars for a program like Final Cut Studio. I’m aware that there are student discounts on software like Photoshop, but many companies still don’t offer them for higher-end applications. On the other hand, many people prefer to get movies from torrent, which is very understandable with movie ticket prices these days. I’ve put together some helpful tips on how to use a torrenting program, uTorrent (PC & Mac) to decrease the time it takes for a torrent to download.
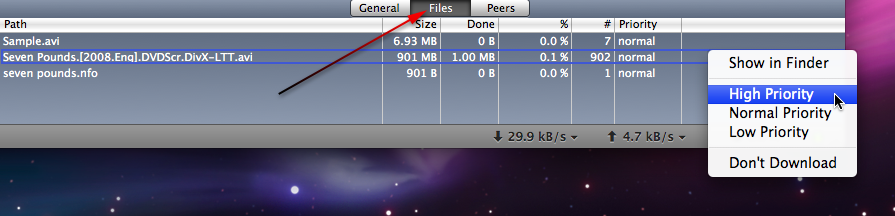
Change Priority For Multiple Torrent Files
By having the ability to change priority on a file basis, you can not only speed up your torrents, but get only the files that you need (e.g. just the video file or serial number).
In uTorrent, go to the Files tab and select the files that you need and right-click.
Change the priority to High Priority.
Next select the files you don’t need (like .nfo, .txt, sample.avi, etc..) and change the priority to Don’t Download.
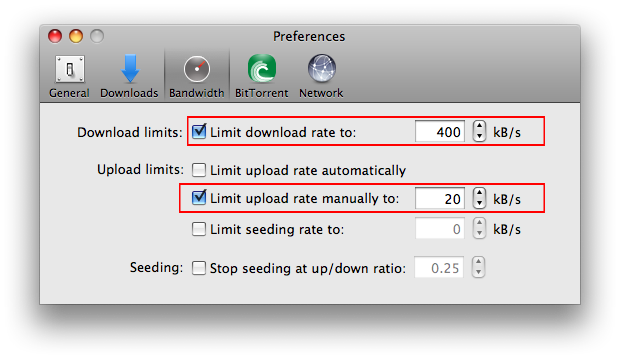
Surprisingly, when you limit the download rate instead of using unlimited speed, the download time will decrease significantly. Same thing with the upload rates, in part because the more you’re uploading the more peers will connect, therefore causing more connections.
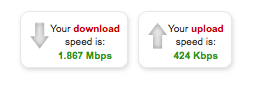
Go take the Verizon online speed test when you aren’t downloading anything.
After the tests are complete, you should get two numbers: the Download rate and the Upload rate.
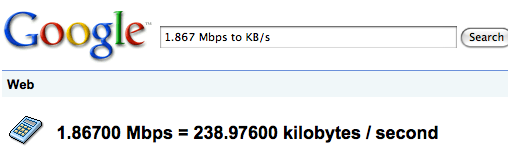
Next you need to convert the rate from Mbps to KB/s via Google (e.g. 1.8 Mbps to KB/s).
Now you use that for your download rate/upload rate in the uTorrent preferences.
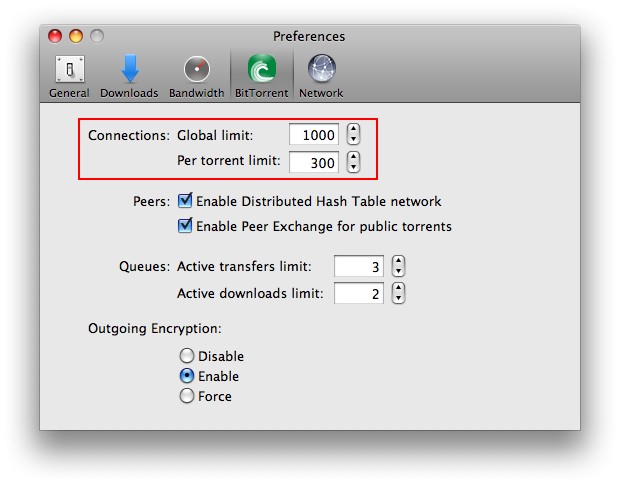
Global Connections limits the number of people worldwide to connect to the torrent you’re downloading.
To change this number, go to uTorrent > Preferences.
Under the BitTorrent tab, increase your Global limit number (e.g. 1000) and the Per Torrent limit (e.g. 300).
If you don’t know what number to put in either of those fields, just experiment until you notice faster download speeds.
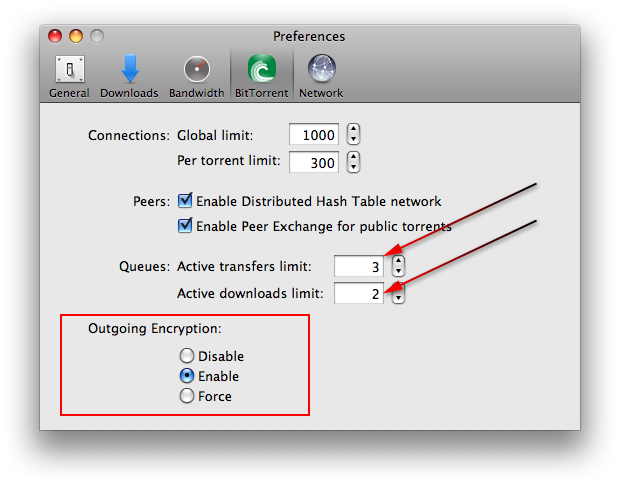
Under the same BitTorrent tab, make two other changes: Queues (Transfers: 3; Downloads: 2) and Outgoing Encryption (Enable).
Those settings will increase your speed because you are limiting the number of active downloads and outgoing encryption, which gives you more overall connections.
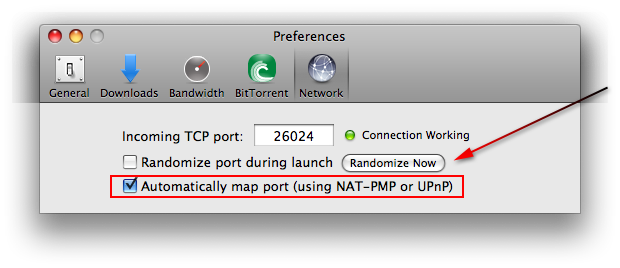
Most torrent networks use the TCP port 6881 and above. Due to the amount of internet usage that BitTorrent accounts for, many internet service providers (e.g. Verizon, Comcast, Bellsouth) want to limit the connection on those ports (6881-6999).
Therefore, it can help to make your TCP port somewhere above 10,000.
Go to uTorrent > Preferences and go to the Network tab. Under the Incoming TCP port field click the Randomize Now button until you see a TCP Port that is above 10,000.
If you are using a router, make sure you have the “Automatically map port” field checked.
If you need access to your router’s settings, go to Network in System Preferences to find the address. Then type in your router address in a web browser. Contact your internet service provider if you have trouble changing your router settings.
A little over two years ago, I bought my first digital SLR camera. When I first started taking pictures with it, I kept the settings in automatic mode. I had the feeling that if it was on automatic, then it would handle just about any situation on its own without any intervention. Well, that was when I found out I was completely wrong. After going to local classes at a camera store, I started to understand the different settings and when to use them. I still continue reading many articles online and tutorial books at my local bookstore. Because I know what it was once like to start off with a DSLR for the first time, I thought I’d share some helpful places where you can find tips on how to use your camera to its full potential.
By far, this has been one the most helpful little books that refreshes just about anything when you need it. The Digital Photography Field Guide book gets you started off with the basics of the camera controls and slowly leads into the more complex things like lighting and exposure. I still bring this book in my camera bag because I know that there will always be a time when I need it.
TWIP is a podcast created by Alex Lindsay of PixelCorps. When I first started listening to this podcast, one of the main things that I really liked was that the guys were straight up about their reviews. They would tell you what works and what doesn’t. That’s the kind of the material you need at the beginning because the further along you come, the more options there are as far as photography equipment and software goes. In each episode, they go over a poll that was posted the previous week, post a contest link, reviews of the week, and websites or podcasts to visit.
When it comes to learning about anything Photoshop, these guys know it best: Scott Kelby, Matt Kloskowski, and Dave Cross. In each video episode, each guy usually shows a tip that they have learned recently in Photoshop. Ranging from anything like making people look skinnier or how to create a holiday card. Thankfully, because they show some really creative tips, I always find something useful that I can use within my own photos. Another nice part of the show is the quick breaks that they have with tips on using your SLR camera or other equipment.
Probably one of the most useful resources for me by far, Digital Photography School, created by Darren Rowse of ProBlogger, has tons of everyday tutorials. Each week, I like to check out the newest content on their website and see if there’s anything that I could use as an outdoor photographer. Fortunately, I always come across something that I can use like “Family Portaits Do’s and Don’ts” or “10 Ways to Take Stunning Portaits“. The best part is that if you are unsure about what to do, you can always ask the thousands of users on the forums who are willing to help you.
Fabio Sasso, is one of the most inspirational graphic designers I’ve ever seen. Everyday, he posts something called “Daily Inspiration”, which is basically a collection of graphic design pieces or photographs that he has found creative. As a photographer, it helps to see how other people work and what other styles of art are out there. I’ve learned to look at taking pictures very differently after browsing through some of Fabio’s Daily Inspiration posts. His blog also covers many other topics such as web design and Photshop, so I would highly recommend you take a look at it.
The first time I saw this magazine was in a bookstore when I was just browsing around the Photography magazine stand. The title of the magazine was what initially grabbed my attention, “Outdoor Photographer”. The main reason it grabbed my eye was the fact that I was an outdoor photographer myself, so it would only make sense for me to be focused on that name. Since that day, I’ve been a subscriber to Outdoor Photographer. I love how they show detailed pictures in their articles to make it feel like you’re actually there. The topics in the magazine cover anything from creating powerful landscape shots to thinking like Ansel Adams. If you’re just starting off with photography, I would recommend keeping the magazines because they are very informative for only a couple of dollars an issue.
One of the best ways to share pictures with friends outside of email is Flickr. Many users like it because it gives others a chance to see your work and comment on it as well. On the other hand, I use it to find out how certain images were taken. One of the coolest features about digital photography is that everything can be stored electronically, including the properties used when taking the picture such as: ISO, shutter speed, white-balance, and aperture. When you want to learn the most about your SLR and when to use certain settings this is when it becomes helpful. When you are browsing through someone Flickr photos, there is usually a link that is called “MoreProperties” located under Additional Information. Having access to what settings were used in other people’s pictures is very valuable information. I also find Flickr helpful for finding places to go. When I’m about to go on trip somewhere, it helps to know what places look nice, especially for photography. And what a better way to find out than Flickr. Users post pictures of the places to visit and best locations for taking pictures. Just like I talking about earlier with Abduzeedo’s Daily Inspiration articles, Flickr has many creative photos which give you a new perspective on how to see things the next time you’re out on a photo shoot.